今回は、Latticeチームのfrolicが先日ローンチした「Emojimon」というMUDチュートリアルを用いて、ポケモンライクな自律型世界(オンチェーンゲーム)を構築してみたいと思います。
💡Lattice
— イーサリアムnavi🧭毎週土曜日の昼に配信 (@ethereumnavi) February 19, 2023
MUDチュートリアル「Emojimon」を発表@frolic が作成したステップバイステップのチュートリアルを通して、
『MUDフレームワークを使用して完全なオンチェーンゲームまたはEthereumアプリケーションを作成する方法』
を学ぶことが可能に
14/https://t.co/atzZSKSqtt
さて、最近では「オンチェーンゲーム」という言葉をよく目にするようになりました。また、資金調達を行うプロダクトも出てきており、注目度が高まっていることを実感しています。
例えば、オンチェーンゲーム領域において資金調達事例の先駆けとなったのは「MatchboxDAO」だと認識していますが、こちらはStarknetエコシステムでのオンチェーンゲーム構築をサポートする組織です。

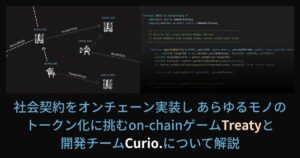
また先日は、Treatyというオンチェーンゲームを構築する「Curio」が、シードラウンドで$2.9Mを調達したことも話題になりました。
A new player has arrived …
— Curio @ETH Denver (@0xcurio) February 21, 2023
We raised $2.9M from @BainCapCrypto, @tcg_crypto and others to build the next generation of crypto games hyper focused on composable user-generated content. pic.twitter.com/pN8uWGqhub
こうした流れから、「オンチェーンゲーム」が徐々に注目を浴びるようになり、その面白さを理解したり、実際に開発してみたいと思う人も増えてきたように、筆者は感じています。
しかしながら、それと同時に『オンチェーンゲームをどのように作成したら良いのか』のイメージが湧かず、遠い存在のように感じられている方も多いのではないかと思われます。
特に、オンチェーンゲームは「全ての処理やステート等をチェーン上に載せる」という点から、一般的なゲーム開発とはやり方や考え方が異なる部分が多々あり、とっつきにくい印象があるかもしれません。
ということで、今回はMUDチュートリアル「Emojimon」を実際に進めながら、MUDの応用や自律型世界の構築手法、またオンチェーンゲーム開発のノウハウについて解説していきたいと思います。
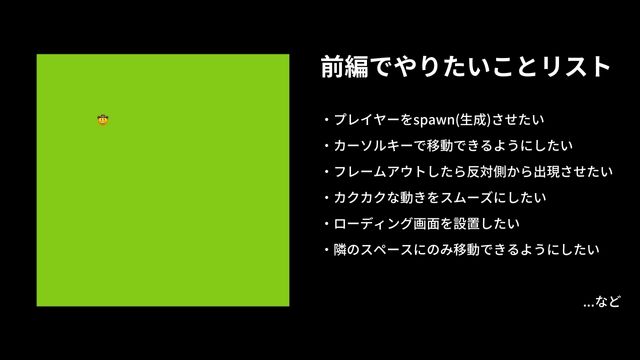
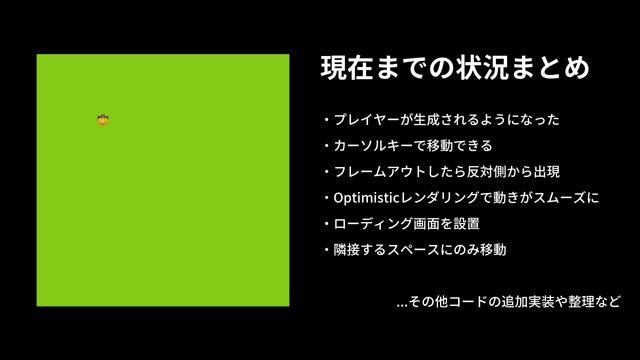
本記事は「前編」ということで、ステップごとに分割して以下について解説します。
- step0
- MUDプロジェクトの立ち上げ
- step1
- 最初のコンポーネントとシステムを作成する
- step2
- ポジションにプレーヤーが表示され、クリックすると移動
- step3
- カーソルキーでプレイヤーを移動させる
- step4
- Optimisticレンダリング
- step5
- コンポーネントによる動作の表現
- step6
- ローディング画面
- step7.1
- マップ設定用のシングルトンコンポーネント
- step7.2
- マップサイズに合わせた移動の制限
- step7.3
- 隣接するスペースにのみ移動
本記事が、MUDチュートリアル「Emojimon」やMUDを用いた自律型世界(オンチェーンゲーム)の構築方法などについて理解したいと思われている方にとって、少しでもお役に立てれば幸いです。
※本記事は一般的な情報提供を目的としたものであり、法的または投資上のアドバイスとして解釈されることを意図したものではなく、また解釈されるべきではありません。ゆえに、特定のFT/NFTの購入を推奨するものではございませんので、あくまで勉強の一環としてご活用ください。
イーサリアムnaviの活動をサポートしたい方は、「定期購読プラン」をご利用ください。
前置き
本記事は、MUDについてある程度理解している方を対象としています。MUDやそれを用いて構築されたオンチェーンゲームがどのような特徴を持つのかご存じないという方は、まず以下の記事を先に読んでおかれることを推奨します。

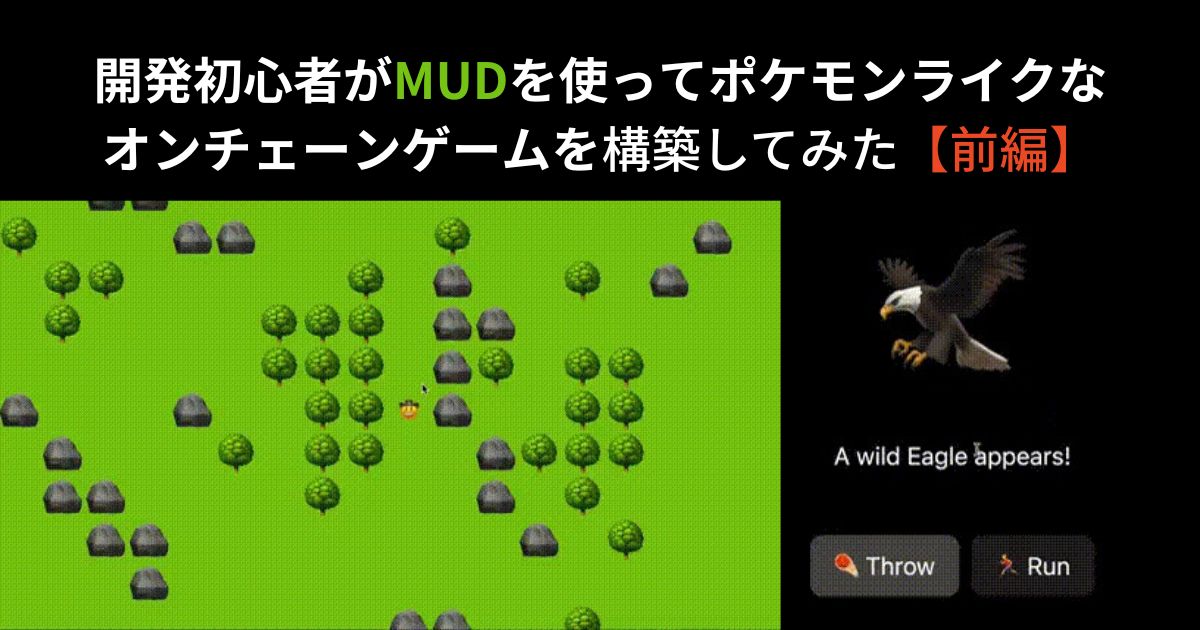
さて本記事では、Emojimonのチュートリアルをベースに、Ethereumアプリケーションおよび自律型世界(Autonomous Worlds)用のフルスタックフレームワーク「MUD」を使用した、ポケモンライクなオンチェーンゲームを作成します。
Emojimonを作成しながら、MUDを用いたオンチェーンゲームの構築方法を学べることが、本チュートリアルの目的となっています。
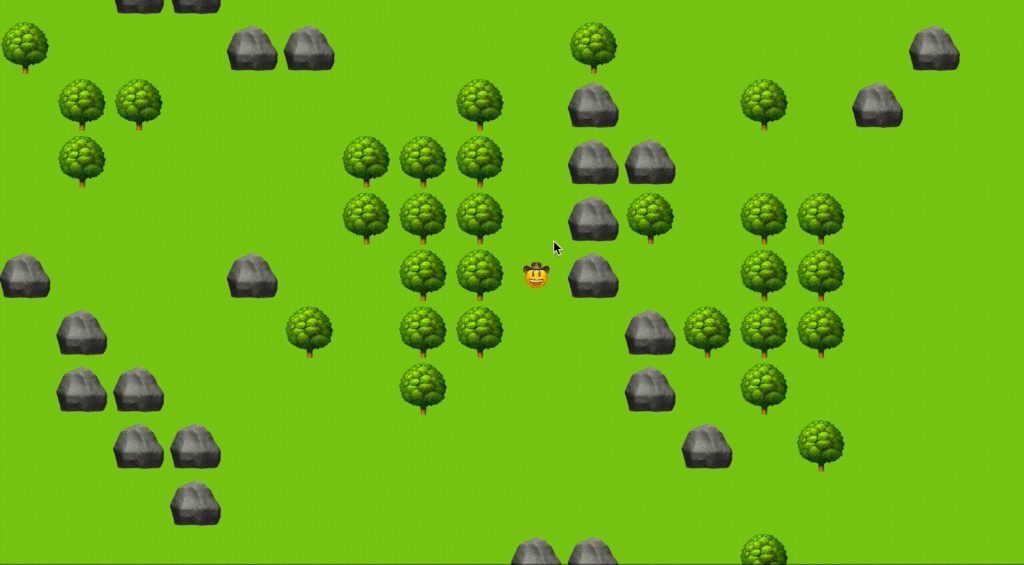
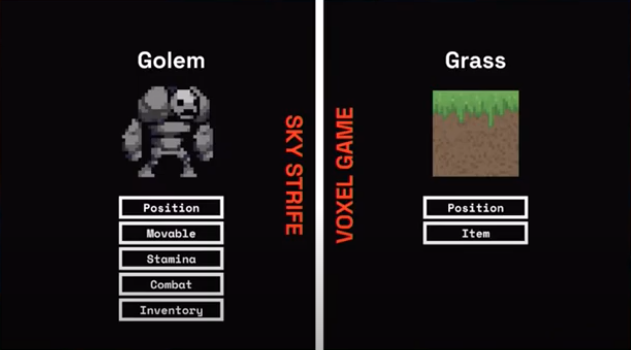
Emojimonチュートリアルを完遂すると、最終的に上写真のようなビジュアルとなりますが、今回は前編ということで下写真の状況に至ることを目指します。
ちなみにfrolic曰く、Emojimonチュートリアルを完遂するためにはSolidityとJavaScript両方の開発経験があることが望まれるとのことですが、厳密には必要ではありません。
 derio
derio筆者自身、開発者としての経験は特になく、Solidityに関しては簡単なNFTを作成できる程度であり、JavaScriptについてはほとんど無知です。
理解できない部分がある場合は、各パートごとに全てのファイルのコードを掲載しているので、コピペできるようにもしています。
ちなみに余談ですが、将来的にはポケモン以外のゲームからインスピレーションを受けたチュートリアルも提供予定とのことです。
Emojimonのチュートリアルをやってみた
さて、筆者は実際にEmojimonを折り返し地点あたりまで試してみました。本章では、その過程で得た知見や、チュートリアルページで分かりづらかった箇所の補足説明、誤っている箇所の修正などを行いながら、日本語で解説していきたいと思います。
まず、今回の筆者の作業環境は以下です
- macOS Monterey v12.5.1
- Visual Studio Code – コード エディター
- Node.js v18.13.0
- npm -v8.5.0
- Homebrew 4.0.3
step0: MUDプロジェクトの立ち上げ
必要なもの・知識
- git
- foundry (forge、anvil、cast)
- ダウンロードし、
foundryupを実行する - エラー発生時の参考記事: Macからcurlを使う方法をご紹介!
- ダウンロードし、
- node.js (v16+)
- yarn
- nodeをインストールした後:
npm install yarn --global
- nodeをインストールした後:
- React、TailwindCSSに慣れていると便利ですが、必須ではありません。
- コピー&ペーストでOK
Windowsをお使いの場合、WSLをセットアップし、正しく設定する必要があります。上記のライブラリやツールは、WSLにインストールする必要があります。また、以下のすべてのコマンドは、WSLで実行する必要があります。Microsoftが提供するWSLガイドを読んで、始めることを推奨します。
0-a|スターターキットを入手する
通常であれば、CLIでyarn create mud emojimonを使用して新しいMUDプロジェクトを開始しますが、このチュートリアルではより早く始めるための初期コード(例えばTailwindCSSによるベーススタイル)がいくつか用意されています。
まず、Emojimon starter kit repoを、以下コマンドでcloneします。
git clone git@github.com:latticexyz/emojimon.git続いてrepoに移動して、依存関係をインストールします。
cd emojimon
yarn
そして、MUDのサービス(anvilノード、コントラクトデプロイヤー、クライアント)を立ち上げます。
yarn dev
yarn devでMUDサービスを実行すると、上画像のように表示されるコントラクトがコンパイルされ、anvilノードにデプロイされると(1〜2分)、自動的にブラウザウィンドウが開き、クライアントアプリが表示されます。

上写真のように、値のない「Counter(カウンター)」と、カウンターを増加させるための「Increment(増加)」ボタンが表示されました。
0-b|トランザクションを送信してみる
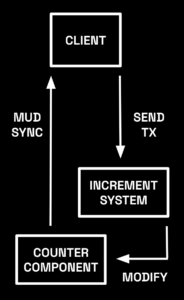
Incrementボタンを押すと、カウンターの値が上昇することが分かります。

ボタンをクリックするたびに、ローカルのEthereumノード(anvil)上のCounterコンポーネントコントラクトにトランザクションが送信されます。それが確定すると、MUDネットワーキングレイヤーがコンポーネント値の変化を検出し、クライアントを更新します。
しかし、MUDの凄さはこれだけではありません。まだ続きがあります。
0-c|コントラクトのリアルタイム再読み込み
挙動を変更してみて、何が起こるかを確認してみましょう。
LibMath.solファイルを開き、インクリメント関数内で加算する数値を1ではなく2に変更してみます。
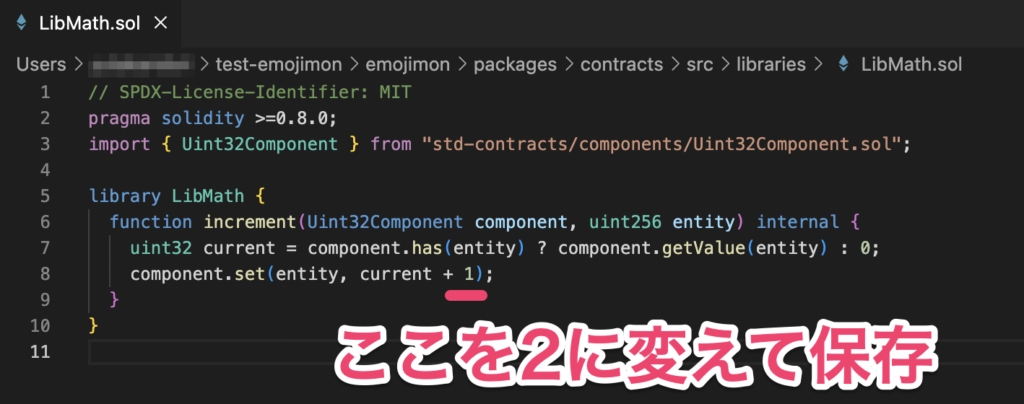
// SPDX-License-Identifier: MIT
pragma solidity >=0.8.0;
import { Uint32Component } from "std-contracts/components/Uint32Component.sol";

library LibMath {
  function increment(Uint32Component component, uint256 entity) internal {
    uint32 current = component.has(entity) ? component.getValue(entity) : 0;
    component.set(entity, current + 2);
  }
}
保存すると、dev:contractsサービスはコントラクトの変更を検知し、すべての依存するコントラクトを再デプロイし、クライアントを自動的に更新してくれます。
クライアントがリロードされたら、”increment” ボタンをクリックして、カウンターの増加値が1ではなく2になっていることを確認してください。

step1: 最初のコンポーネントとシステムを作成する
ゲーム内にあるほとんどのエンティティは、プレイヤーや地形、インタラクティブなタイルなど、2Dマップ上に配置されることになります。
これを表現するために、各エンティティに追加できるPosition(位置)コンポーネントを作成します。そして、エンティティを別の位置に移動させるために呼び出すことができるMove(移動)システムを作成します。
1-a|Positionコンポーネント
「packages/contracts/src/components」に『PositionComponent.sol』というファイルを新たに作成します。これはMUDのCoordComponentを継承することができます。
cd packages/contracts/src/components/
touch PositionComponent.sol
// SPDX-License-Identifier: MIT
pragma solidity >=0.8.0;
import "std-contracts/components/CoordComponent.sol";
uint256 constant ID = uint256(keccak256("component.Position"));
contract PositionComponent is CoordComponent {
constructor(address world) CoordComponent(world, ID) {}
}1-b|Moveシステム
「packages/contracts/src/systems」ディレクトリに『MoveSystem.sol』というファイルを作成し、その中で、位置の値を更新してエンティティを移動できるようにしましょう。
// emojimonディレクトリに戻ってから
cd packages/contracts/src/systems
touch MoveSystem.sol
ECSでは、世界のあらゆる「モノ」がエンティティであり、エンティティは単なるIDに過ぎません。このゲームにはプレイヤーが登場し、それぞれがIDを持つエンティティとして表現されます。各ゲームクライアントはウォレットアドレス(msg.sender)を介してコントラクトと会話するので、それをエンティティIDとして使用することができます。
そして、MUDにはアドレスとエンティティIDを変換するためのaddressToEntityヘルパーが用意されています。
// SPDX-License-Identifier: MIT
pragma solidity >=0.8.0;
import { System, IWorld } from "solecs/System.sol";
import { getAddressById, addressToEntity } from "solecs/utils.sol";
import { PositionComponent, ID as PositionComponentID, Coord } from "components/PositionComponent.sol";

uint256 constant ID = uint256(keccak256("system.Move"));

contract MoveSystem is System {
  constructor(IWorld _world, address _components) System(_world, _components) {}

  function execute(bytes memory args) public returns (bytes memory) {
    return executeTyped(abi.decode(args, (Coord)));
  }

  function executeTyped(Coord memory coord) public returns (bytes memory) {
    uint256 entityId = addressToEntity(msg.sender);

    PositionComponent position = PositionComponent(getAddressById(components, PositionComponentID));
    position.set(entityId, coord);
  }
}
1-c|デプロイメント設定
MUDでは、コンポーネントやシステムを追加するたびにdeploy.jsonを更新する必要があり、これを利用してコンポーネントやシステムのデプロイ及び接続を行います。
MoveSystemにPositionComponentの値を設定するので、それがwriteAccessを必要とすることも宣言しなければなりません。
// contractsディレクトリにdeploy.jsonファイルを作成
cd packages/contracts
touch deploy.json
以下のコードをコピペして保存します。
{
  "components": ["PositionComponent"],
  "systems": [
    {
      "name": "MoveSystem",
      "writeAccess": ["PositionComponent"]
    }
  ]
}
続いて、クライアントにこれを配線していきましょう。
step2: ポジションにプレーヤーが表示され、クリックすると移動
先ほど作ったコンポーネントやシステムが実際に動いているところを見れば、よりリアルに感じられるはずです。本節では、それらを使うためのクライアントをセットアップしてみましょう。
2-a|クライアント側コンポーネント
新しいPositionコンポーネントをクライアントで使用する前に、components.tsファイルで定義する必要があります。
これにより、MUDのネットワークレイヤーがコントラクト内のコンポーネントの値の更新をデコードし、クライアントでクエリできるようになります。
import { defineCoordComponent } from "@latticexyz/std-client";
import { world } from "./world";

export const components = {
  Position: defineCoordComponent(world, {
    metadata: {
      contractId: "component.Position",
    },
  }),
};

export const clientComponents = {};
2-b|世界をレンダリング
世界を表現するGameBoardという新しいReactコンポーネントを作ってみましょう。
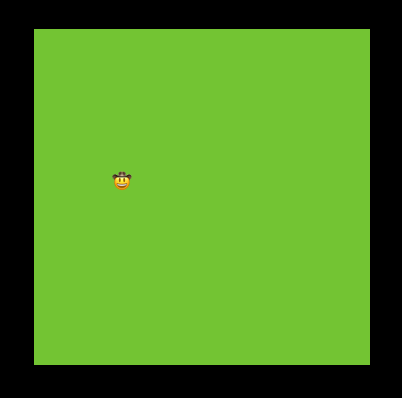
まずはシンプルな10×10のグリッドをレンダリングし、ライムグリーンを「草」として塗りつぶします。
cd client/src
touch GameBoard.tsx
export const GameBoard = () => {
const rows = new Array(10).fill(0).map((_, i) => i);
const columns = new Array(10).fill(0).map((_, i) => i);
return (
<div className="inline-grid p-2 bg-lime-500">
{rows.map((y) =>
columns.map((x) => (
<div
key={`${x},${y}`}
className="w-8 h-8"
style={{
gridColumn: x + 1,
gridRow: y + 1,
}}
></div>
))
)}
</div>
);
};拡張子「.tsx」は、TypeScriptを使用して書かれたReactコンポーネントを含むファイルの拡張子です。
次に、ベースとなるAppコンポーネントから新しいGameBoardコンポーネントをレンダリングし、以前のcounter incrementロジックを置き換えます。
import { GameBoard } from "./GameBoard";

export const App = () => {
  return (
    <div className="w-screen h-screen flex items-center justify-center">
      <GameBoard />
    </div>
  );
};そして、index.htmlにちょっとした手を加えてページを黒い背景にすることで、よりゲーム機のような雰囲気に仕上げてみます。
<meta name="viewport" content="width=device-width, initial-scale=1.0" />
    <title>a minimal MUD client</title>
  </head>
  <body class="bg-black text-white">
    <div id="react-root"></div>
    <script type="module" src="/src/index.tsx"></script>
  </body>
2-c|プレーヤーを移動させる
ゲームボードには、まだポジションがないのでプレイヤーは存在しません。各タイルにクリックハンドラーを設定して、プレイヤーの位置を設定しましょう。(先ほどのMoveSystem.solを使います)
これにより、タイルがクリックされるとプレイヤーが現れ、他のタイルをクリックすることでマップ上を移動し続けることができるようになります。
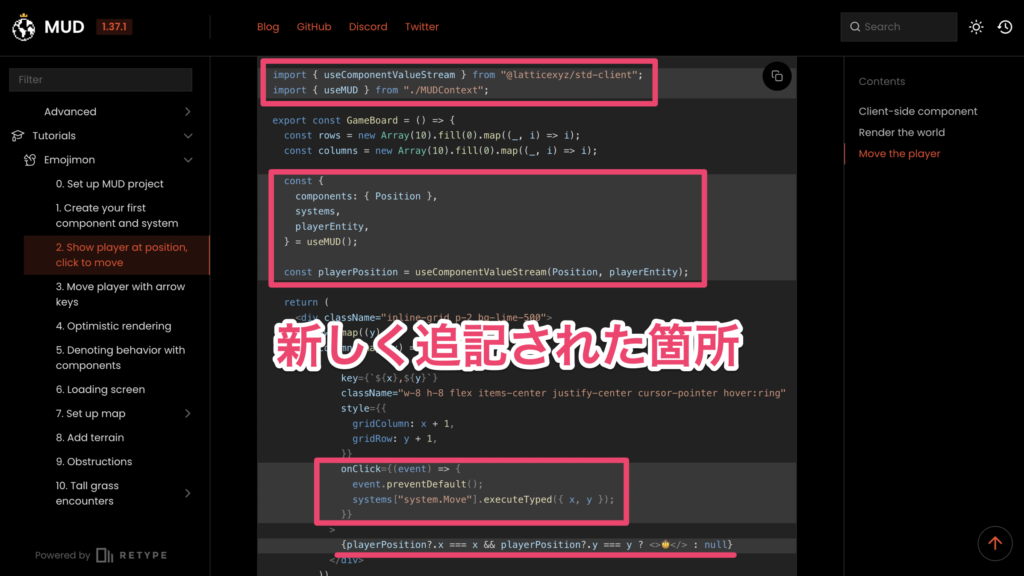
import { useComponentValueStream } from "@latticexyz/std-client";
import { useMUD } from "./MUDContext";

export const GameBoard = () => {
  const rows = new Array(10).fill(0).map((_, i) => i);
  const columns = new Array(10).fill(0).map((_, i) => i);

  const {
    components: { Position },
    systems,
    playerEntity,
  } = useMUD();

  const playerPosition = useComponentValueStream(Position, playerEntity);

  return (
    <div className="inline-grid p-2 bg-lime-500">
      {rows.map((y) =>
        columns.map((x) => (
          <div
            key={`${x},${y}`}
            className="w-8 h-8 flex items-center justify-center cursor-pointer hover:ring"
            style={{
              gridColumn: x + 1,
              gridRow: y + 1,
            }}
            onClick={(event) => {
              event.preventDefault();
              systems["system.Move"].executeTyped({ x, y });
            }}
          >
            {playerPosition?.x === x && playerPosition?.y === y ? <>🤠</> : null}
          </div>
        ))
      )}
    </div>
  );
};
step3: カーソルキーでプレイヤーを移動させる
本節では、キーボードを操作してプレーヤーの位置を制御するように配線していきます。
windowのkeydownイベントを受け取り、どのカーソルキーが押されたかに応じてプレーヤーを移動させることにします。
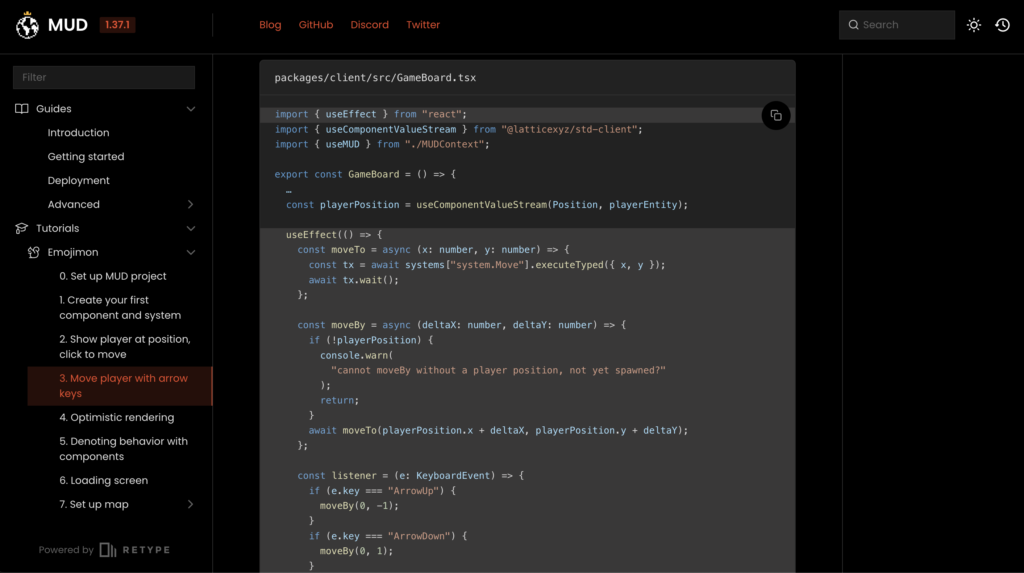
...の箇所でエラーになりますのでお気をつけください(...は省略の意で用いられています)。import { useEffect } from "react";
import { useComponentValueStream } from "@latticexyz/std-client";
import { useMUD } from "./MUDContext";
export const GameBoard = () => {
const rows = new Array(10).fill(0).map((_, i) => i);
const columns = new Array(10).fill(0).map((_, i) => i);
const {
components: { Position },
systems,
playerEntity,
} = useMUD();
const playerPosition = useComponentValueStream(Position, playerEntity);
useEffect(() => {
const moveTo = async (x: number, y: number) => {
const tx = await systems["system.Move"].executeTyped({ x, y });
await tx.wait();
};
const moveBy = async (deltaX: number, deltaY: number) => {
if (!playerPosition) {
console.warn(
"cannot moveBy without a player position, not yet spawned?"
);
return;
}
await moveTo(playerPosition.x + deltaX, playerPosition.y + deltaY);
};
const listener = (e: KeyboardEvent) => {
if (e.key === "ArrowUp") {
moveBy(0, -1);
}
if (e.key === "ArrowDown") {
moveBy(0, 1);
}
if (e.key === "ArrowLeft") {
moveBy(-1, 0);
}
if (e.key === "ArrowRight") {
moveBy(1, 0);
}
};
window.addEventListener("keydown", listener);
return () => window.removeEventListener("keydown", listener);
}, [playerPosition, systems]);
return (
<div className="inline-grid p-2 bg-lime-500">
{rows.map((y) =>
columns.map((x) => (
<div
key={`${x},${y}`}
className="w-8 h-8 flex items-center justify-center cursor-pointer hover:ring"
style={{
gridColumn: x + 1,
gridRow: y + 1,
}}
onClick={(event) => {
event.preventDefault();
systems["system.Move"].executeTyped({ x, y });
}}
>
{playerPosition?.x === x && playerPosition?.y === y ? <>🤠</> : null}
</div>
))
)}
</div>
);
};step4: Optimisticレンダリング
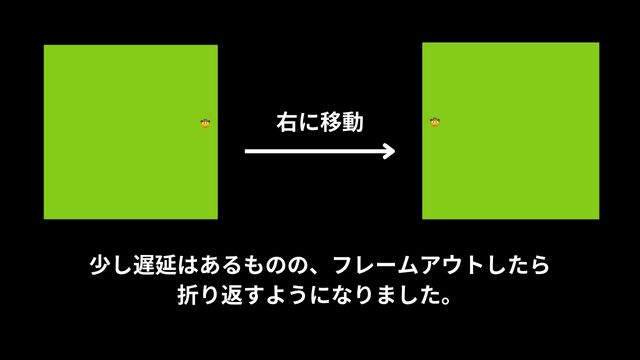
step3により、プレイヤーをキーボードで移動できるようになりましたが、動きが少し遅れて感じられます。
そこでstep4では、Optimisticレンダリングを追加して、パフォーマンスを向上させていきましょう。
4-a|positionのオーバーライドを有効にする
まず、PositionコンポーネントをoverridableComponentでラップする必要があります。
これにより、コンポーネントの値に対してクライアント側のみで(サーバー側に影響を与えずに)アップデートを適用することができます。
import { setupMUDNetwork } from "@latticexyz/std-client";
import { SystemTypes } from "contracts/types/SystemTypes";
import { config } from "./config";
import { components, clientComponents } from "./components";
import { world } from "./world";
import { SystemAbis } from "contracts/types/SystemAbis.mjs";
import { EntityID, overridableComponent } from "@latticexyz/recs";
import {
  createFaucetService,
  GodID as singletonEntityId,
} from "@latticexyz/network";
import { ethers } from "ethers";

export type SetupResult = Awaited<ReturnType<typeof setup>>;

export const setup = async () => {
  const result = await setupMUDNetwork<typeof components, SystemTypes>(
    config,
    world,
    components,
    SystemAbis
  );

  result.startSync();

  // For LoadingState updates
  const singletonEntity = world.registerEntity({ id: singletonEntityId });

  // Register player entity
  const address = result.network.connectedAddress.get();
  if (!address) throw new Error("Not connected");

  const playerEntityId = address as EntityID;
  const playerEntity = world.registerEntity({ id: playerEntityId });

    // Add support for optimistic rendering
    const componentsWithOverrides = {
      Position: overridableComponent(components.Position),
    };

  // Request drip from faucet
  if (!config.devMode && config.faucetServiceUrl) {
    const faucet = createFaucetService(config.faucetServiceUrl);
    console.info("[Dev Faucet]: Player Address -> ", address);

    const requestDrip = async () => {
      const balance = await result.network.signer.get()?.getBalance();
      console.info(`[Dev Faucet]: Player Balance -> ${balance}`);
      const playerIsBroke = balance?.lte(ethers.utils.parseEther("1"));
      console.info(`[Dev Faucet]: Player is broke -> ${playerIsBroke}`);
      if (playerIsBroke) {
        console.info("[Dev Faucet]: Dripping funds to player");
        // Double drip
        address &&
          (await faucet?.dripDev({ address })) &&
          (await faucet?.dripDev({ address }));
      }
    };

    requestDrip();
    // Request a drip every 20 seconds
    setInterval(requestDrip, 20000);
  }

  return {
    ...result,
    world,
    singletonEntityId,
    singletonEntity,
    playerEntityId,
    playerEntity,
    components: {
      ...result.components,
      ...componentsWithOverrides,
      ...clientComponents,
    },
  };
};
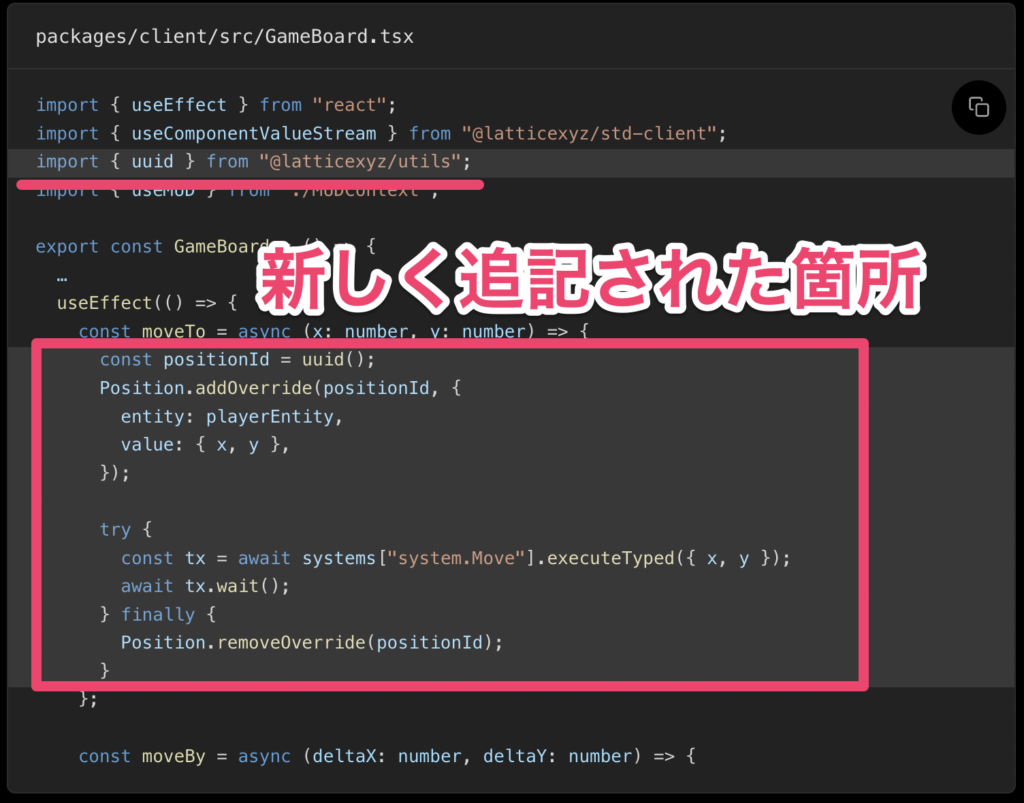
4-b|positionの値をオーバーライド(上書き)
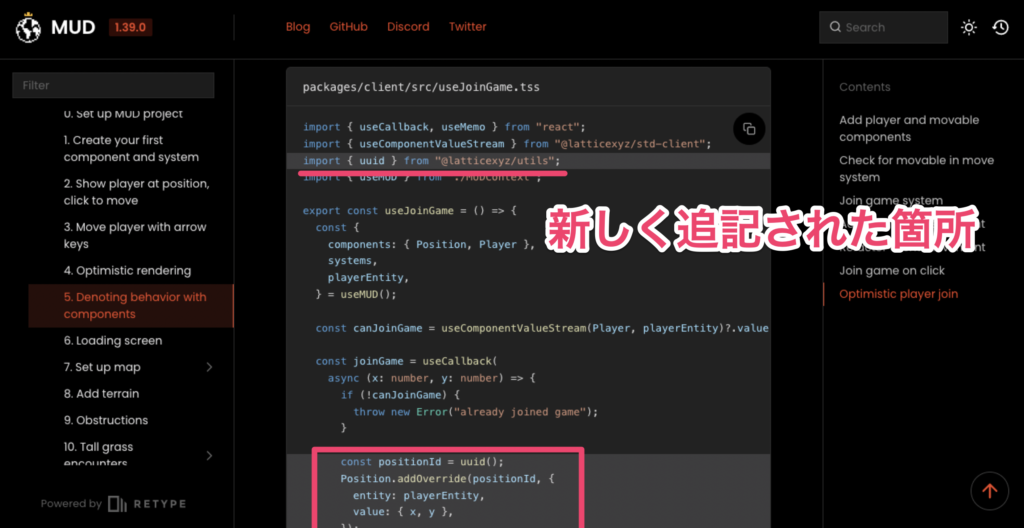
そして、moveシステムを呼び出す前にpositionの値をオーバーライドし、トランザクションが完了したら(または失敗したら)オーバーライドを解除することができます。
import { useEffect } from "react";
import { useComponentValueStream } from "@latticexyz/std-client";
import { uuid } from "@latticexyz/utils";
import { useMUD } from "./MUDContext";

export const GameBoard = () => {
  const rows = new Array(10).fill(0).map((_, i) => i);
  const columns = new Array(10).fill(0).map((_, i) => i);

  const {
    components: { Position },
    systems,
    playerEntity,
  } = useMUD();

  const playerPosition = useComponentValueStream(Position, playerEntity);

  useEffect(() => {
    const moveTo = async (x: number, y: number) => {
      const positionId = uuid();
      Position.addOverride(positionId, {
        entity: playerEntity,
        value: { x, y },
      });

      try {
        const tx = await systems["system.Move"].executeTyped({ x, y });
        await tx.wait();
      } finally {
        Position.removeOverride(positionId);
      }
    };

    const moveBy = async (deltaX: number, deltaY: number) => {
      if (!playerPosition) {
        console.warn(
          "cannot moveBy without a player position, not yet spawned?"
        );
        return;
      }
      await moveTo(playerPosition.x + deltaX, playerPosition.y + deltaY);
    };

    const listener = (e: KeyboardEvent) => {
      if (e.key === "ArrowUp") {
        moveBy(0, -1);
      }
      if (e.key === "ArrowDown") {
        moveBy(0, 1);
      }
      if (e.key === "ArrowLeft") {
        moveBy(-1, 0);
      }
      if (e.key === "ArrowRight") {
        moveBy(1, 0);
      }
    };

    window.addEventListener("keydown", listener);
    return () => window.removeEventListener("keydown", listener);
  }, [playerPosition, systems]);

  return (
    <div className="inline-grid p-2 bg-lime-500">
      {rows.map((y) =>
        columns.map((x) => (
          <div
            key={`${x},${y}`}
            className="w-8 h-8 flex items-center justify-center cursor-pointer hover:ring"
            style={{
              gridColumn: x + 1,
              gridRow: y + 1,
            }}
            onClick={(event) => {
              event.preventDefault();
              systems["system.Move"].executeTyped({ x, y });
            }}
          >
            {playerPosition?.x === x && playerPosition?.y === y ? <>🤠</> : null}
          </div>
        ))
      )}
    </div>
  );
};step5: コンポーネントによる動作の表現
Movableを持たないエンティティも実装できる仕様に変えたい現在、プレイヤーのエンティティについては多くの想定をしているため、どのエンティティでもMovable(移動可能)な状態になっています。
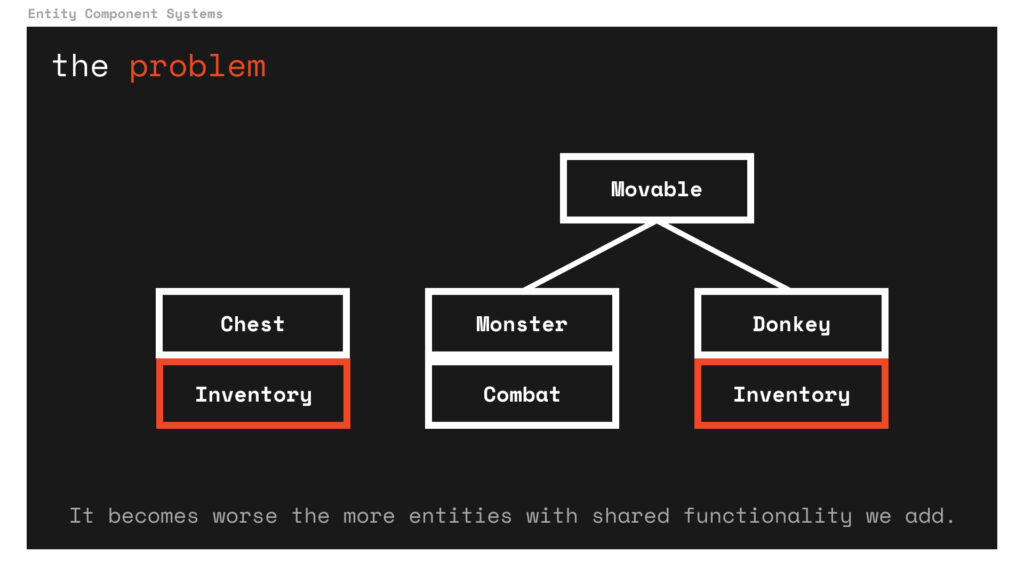
5-a|playerコンポーネントとmovableコンポーネントの追加
1つはエンティティがプレイヤーであるかどうかを示すもので、もう1つはエンティティが移動可能かどうかを示すものです。どちらも単純なbool型のコンポーネントとなっています。
// packages/contracts/src/componentsディレクトリに PlayerComponent.sol, MovableComponent.solファイルを作成
cd packages/contracts/src/components
touch PlayerComponent.sol
touch MovableComponent.sol
// SPDX-License-Identifier: MIT
pragma solidity >=0.8.0;
import "std-contracts/components/BoolComponent.sol";
uint256 constant ID = uint256(keccak256("component.Player"));
contract PlayerComponent is BoolComponent {
constructor(address world) BoolComponent(world, ID) {}
}// SPDX-License-Identifier: MIT
pragma solidity >=0.8.0;
import "std-contracts/components/BoolComponent.sol";
uint256 constant ID = uint256(keccak256("component.Movable"));
contract MovableComponent is BoolComponent {
constructor(address world) BoolComponent(world, ID) {}
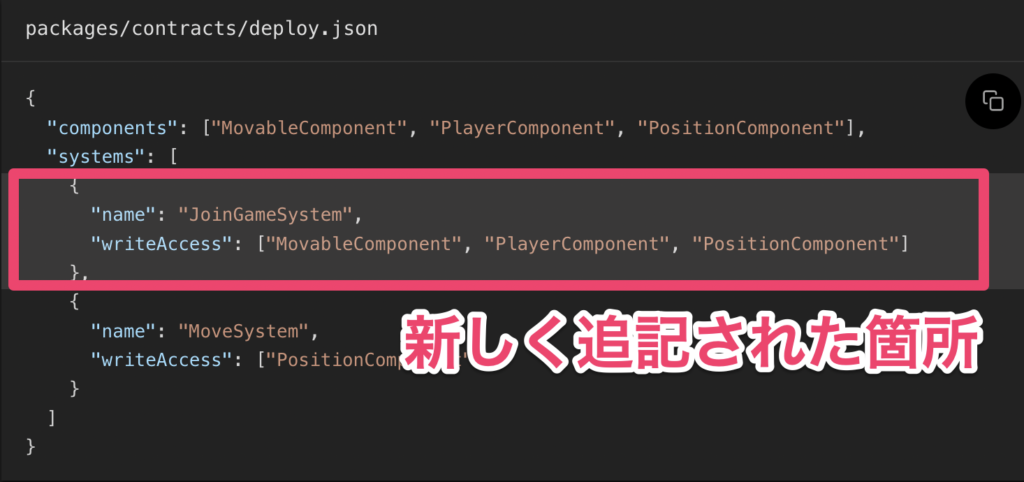
}そして、MUDにこれらの新しいコンポーネントをデプロイしたい旨を伝え、次のステップ6で使い始められるようにします。
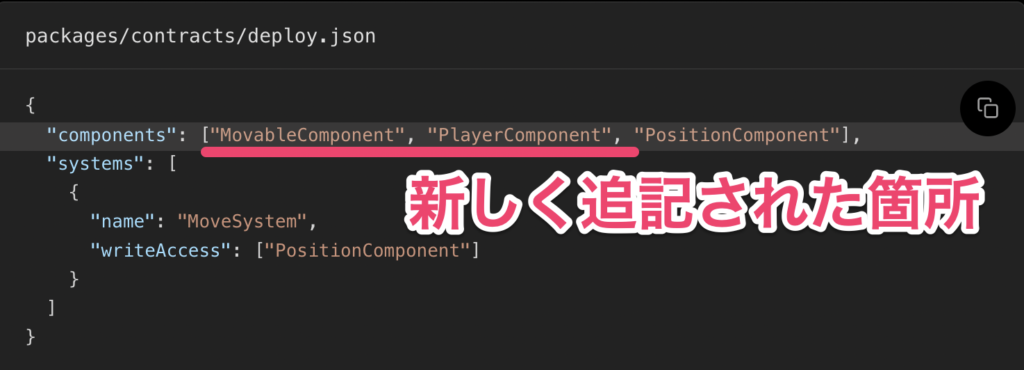
{
  "components": ["MovableComponent", "PlayerComponent", "PositionComponent"],
  "systems": [
    {
      "name": "MoveSystem",
      "writeAccess": ["PositionComponent"]
    }
  ]
}
5-b|moveシステムでMovableのチェック
現在moveシステムでは、移動させる前にエンティティがmovable(移動可能)かどうかをチェックすることができます。これにより、将来的に非常に大きな柔軟性が生まれます。エンティティをmovableにしたい場合は、Movableコンポーネントを追加するだけで、あとはmoveシステムが処理してくれるのです。
このチュートリアルでは、moveシステムを簡略化するため、「msg.senderが移動するエンティティである」という仮定をしています。
しかし、entityIdを引数に取り、msg.senderがそのエンティティ(例えばOwnedByコンポーネント)を「制御」できるかどうかをチェックしてから、移動可能なように拡張することもできます。

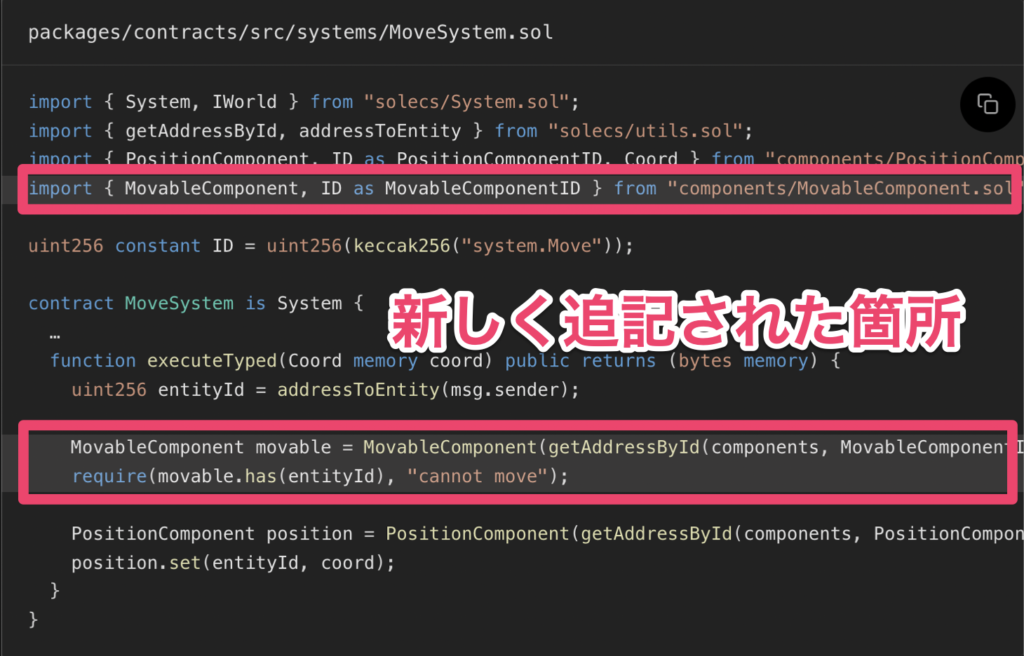
// SPDX-License-Identifier: MIT
pragma solidity >=0.8.0;
import { System, IWorld } from "solecs/System.sol";
import { getAddressById, addressToEntity } from "solecs/utils.sol";
import { PositionComponent, ID as PositionComponentID, Coord } from "components/PositionComponent.sol";
import { MovableComponent, ID as MovableComponentID } from "components/MovableComponent.sol";

uint256 constant ID = uint256(keccak256("system.Move"));

contract MoveSystem is System {
  constructor(IWorld _world, address _components) System(_world, _components) {}

  function execute(bytes memory args) public returns (bytes memory) {
    return executeTyped(abi.decode(args, (Coord)));
  }

  function executeTyped(Coord memory coord) public returns (bytes memory) {
    uint256 entityId = addressToEntity(msg.sender);

    MovableComponent movable = MovableComponent(getAddressById(components, MovableComponentID));
    require(movable.has(entityId), "cannot move");

    PositionComponent position = PositionComponent(getAddressById(components, PositionComponentID));
    position.set(entityId, coord);
  }
}
5-c|Join game systemを追加
Movableコンポーネントを追加していないので、技術的にはプレイヤー・エンティティは動くことができません。
// packages/contracts/src/systemsディレクトリに JoinGameSystem.solファイルを作成
cd packages/contracts/src/systems
touch JoinGameSystem.sol
// SPDX-License-Identifier: MIT
pragma solidity >=0.8.0;
import { addressToEntity } from "solecs/utils.sol";
import { System, IWorld } from "solecs/System.sol";
import { getAddressById } from "solecs/utils.sol";
import { PlayerComponent, ID as PlayerComponentID } from "components/PlayerComponent.sol";
import { PositionComponent, ID as PositionComponentID, Coord } from "components/PositionComponent.sol";
import { MovableComponent, ID as MovableComponentID } from "components/MovableComponent.sol";
uint256 constant ID = uint256(keccak256("system.JoinGame"));
contract JoinGameSystem is System {
constructor(IWorld _world, address _components) System(_world, _components) {}
function execute(bytes memory args) public returns (bytes memory) {
Coord memory coord = abi.decode(args, (Coord));
return executeTyped(coord);
}
function executeTyped(Coord memory coord) public returns (bytes memory) {
uint256 entityId = addressToEntity(msg.sender);
PlayerComponent player = PlayerComponent(getAddressById(components, PlayerComponentID));
require(!player.has(entityId), "already joined");
player.set(entityId);
PositionComponent(getAddressById(components, PositionComponentID)).set(entityId, coord);
MovableComponent(getAddressById(components, MovableComponentID)).set(entityId);
}
}先ほどのmoveシステムの時と同様にdeploy.jsonを拡張し、新しいjoinシステムとそれに書き込む必要のあるコンポーネントを含める必要があります。
{
  "components": ["MovableComponent", "PlayerComponent", "PositionComponent"],
  "systems": [
    {
      "name": "JoinGameSystem",
      "writeAccess": ["MovableComponent", "PlayerComponent", "PositionComponent"]
    },
    {
      "name": "MoveSystem",
      "writeAccess": ["PositionComponent"]
    }
  ]
}
5-d|クライアントにコンポーネントを追加
将来的には、MUDが自動的にクライアントコードを生成してくれるようにしたいと考えられているそうですが、執筆時点では新しいコンポーネントを手動でクライアントに追加する必要があります。
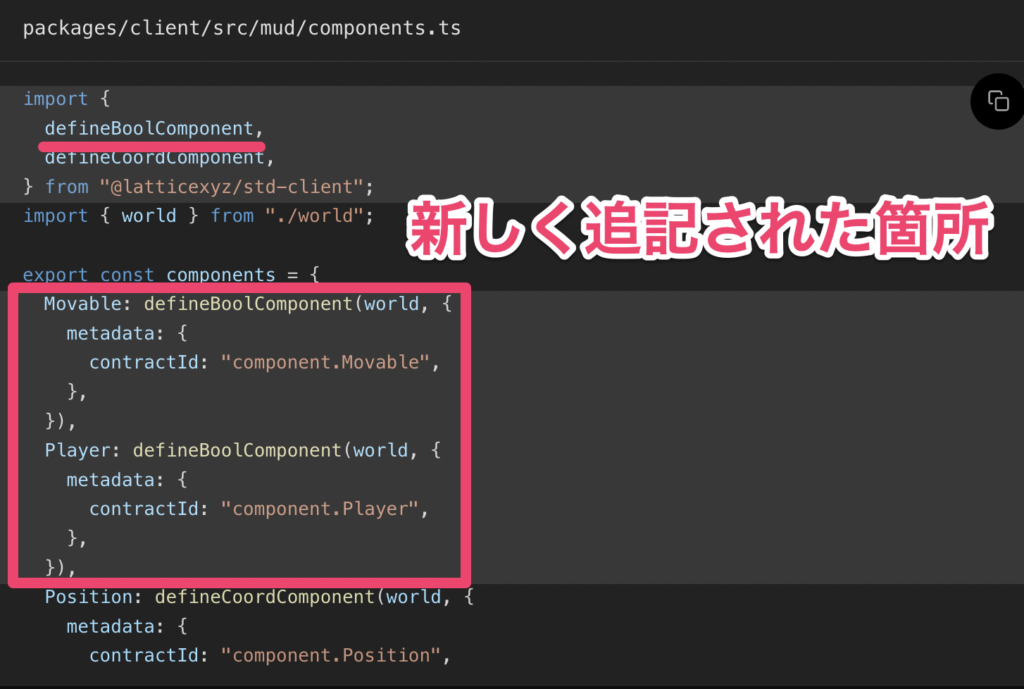
import {
  defineBoolComponent,
  defineCoordComponent,
} from "@latticexyz/std-client";
import { world } from "./world";

export const components = {
  Movable: defineBoolComponent(world, {
    metadata: {
      contractId: "component.Movable",
    },
  }),
  Player: defineBoolComponent(world, {
    metadata: {
      contractId: "component.Player",
    },
  }),
  Position: defineCoordComponent(world, {
    metadata: {
      contractId: "component.Position",
    },
  }),
};

export const clientComponents = {};
5-e|クライアント動作のリファクタリング
ゲームボードファイルが少し大きくなってきました。join game systemを配線する前に、movementコードを独自のフックにリファクタリングして、使いやすくしておきましょう。
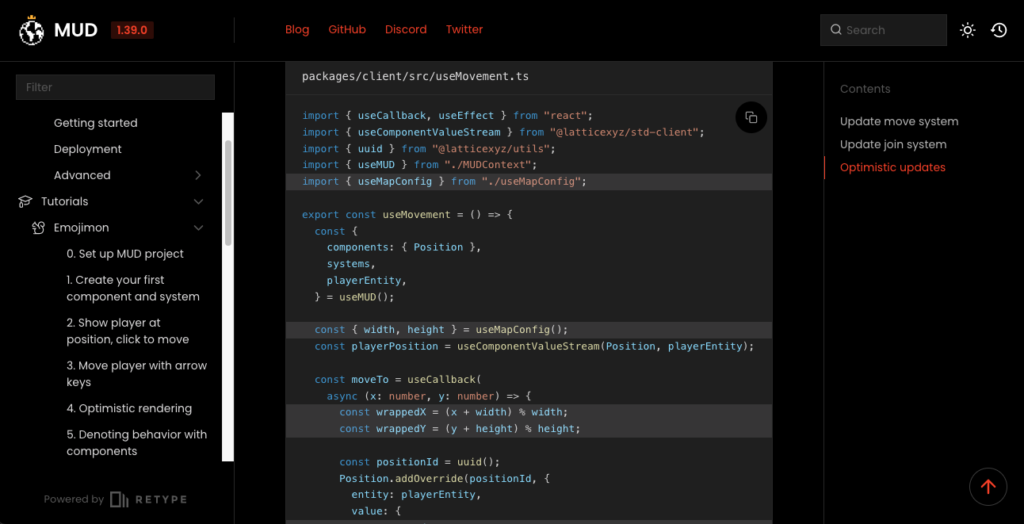
// packages/client/srcディレクトリに useMovement.tsファイルを作成
cd packages/client/src
touch useMovement.ts
import { useCallback, useEffect, useMemo } from "react";
import { useComponentValueStream } from "@latticexyz/std-client";
import { uuid } from "@latticexyz/utils";
import { useMUD } from "./MUDContext";
export const useMovement = () => {
const {
components: { Position },
systems,
playerEntity,
} = useMUD();
const playerPosition = useComponentValueStream(Position, playerEntity);
const moveTo = useCallback(
async (x: number, y: number) => {
const positionId = uuid();
Position.addOverride(positionId, {
entity: playerEntity,
value: { x, y },
});
try {
const tx = await systems["system.Move"].executeTyped({ x, y });
await tx.wait();
} finally {
Position.removeOverride(positionId);
}
},
[Position, playerEntity, systems]
);
const moveBy = useCallback(
async (deltaX: number, deltaY: number) => {
if (!playerPosition) {
console.warn("cannot moveBy without a player position, not yet spawned?");
return;
}
await moveTo(playerPosition.x + deltaX, playerPosition.y + deltaY);
},
[moveTo, playerPosition]
);
useEffect(() => {
const listener = (e: KeyboardEvent) => {
if (e.key === "ArrowUp") {
moveBy(0, -1);
}
if (e.key === "ArrowDown") {
moveBy(0, 1);
}
if (e.key === "ArrowLeft") {
moveBy(-1, 0);
}
if (e.key === "ArrowRight") {
moveBy(1, 0);
}
};
window.addEventListener("keydown", listener);
return () => window.removeEventListener("keydown", listener);
}, [moveBy]);
return useMemo(() => ({ moveTo, moveBy }), [moveTo, moveBy]);
};これで、移動に関するロジックを、すべて新しいフックに置き換えることができます。
import { useComponentValueStream } from "@latticexyz/std-client";
import { useMUD } from "./MUDContext";
import { useMovement } from "./useMovement";

export const GameBoard = () => {
  const rows = new Array(10).fill(0).map((_, i) => i);
  const columns = new Array(10).fill(0).map((_, i) => i);

  const {
    components: { Position },
    playerEntity,
  } = useMUD();

  const playerPosition = useComponentValueStream(Position, playerEntity);
  const { moveTo } = useMovement();

  return (
    <div className="inline-grid p-2 bg-lime-500">
      {rows.map((y) =>
        columns.map((x) => (
          <div
            key={`${x},${y}`}
            className="w-8 h-8 flex items-center justify-center cursor-pointer hover:ring"
            style={{
              gridColumn: x + 1,
              gridRow: y + 1,
            }}
            onClick={(event) => {
              event.preventDefault();
              moveTo(x, y);
            }}
          >
            {playerPosition?.x === x && playerPosition?.y === y ? <>🤠</> : null}
          </div>
        ))
      )}
    </div>
  );
};
5-f|クリックでゲームに参加
movementフックと同様に「既に参加しているか否か」を判断し、参加していない場合にはシステムを呼び出すための『join gameフック』が必要です。
// packages/client/srcディレクトリに useJoinGame.tsファイルを作成
cd packages/client/src
touch useJoinGame.ts
import { useCallback, useMemo } from "react";
import { useComponentValueStream } from "@latticexyz/std-client";
import { useMUD } from "./MUDContext";
export const useJoinGame = () => {
const {
components: { Player },
systems,
playerEntity,
} = useMUD();
const canJoinGame = useComponentValueStream(Player, playerEntity)?.value !== true;
const joinGame = useCallback(
async (x: number, y: number) => {
if (!canJoinGame) {
throw new Error("already joined game");
}
const tx = await systems["system.JoinGame"].executeTyped({ x, y });
await tx.wait();
},
[canJoinGame, systems]
);
return useMemo(() => ({ canJoinGame, joinGame }), [canJoinGame, joinGame]);
};そして、ゲームボードに追加します。
import { useComponentValueStream } from "@latticexyz/std-client";
import { useMUD } from "./MUDContext";
import { useMovement } from "./useMovement";
import { useJoinGame } from "./useJoinGame";
export const GameBoard = () => {
const rows = new Array(10).fill(0).map((_, i) => i);
const columns = new Array(10).fill(0).map((_, i) => i);
const {
components: { Position },
playerEntity,
} = useMUD();
const playerPosition = useComponentValueStream(Position, playerEntity);
const { moveTo } = useMovement();
const { canJoinGame, joinGame } = useJoinGame();
return (
<div className="inline-grid p-2 bg-lime-500">
{rows.map((y) =>
columns.map((x) => (
<div
key={`${x},${y}`}
className="w-8 h-8 flex items-center justify-center cursor-pointer hover:ring"
style={{
gridColumn: x + 1,
gridRow: y + 1,
}}
onClick={(event) => {
event.preventDefault();
if (canJoinGame) {
joinGame(x, y);
} else {
moveTo(x, y);
}
}}
>
{playerPosition?.x === x && playerPosition?.y === y ? <>🤠</> : null}
</div>
))
)}
</div>
);
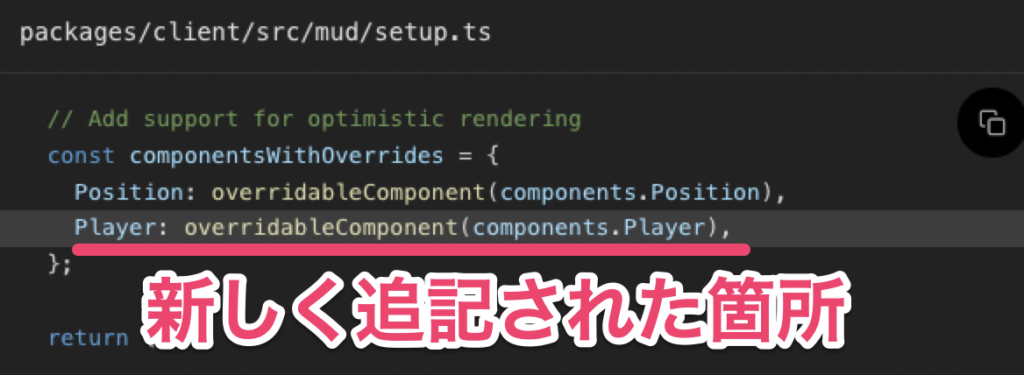
};5-g|Optimisticなプレイヤー参加
タイルをクリックしてからプレイヤーが表示されるまでに遅延が生じることがあります。
movementのOptimisticレンダリングと同様に、オーバーライドを使用してプレイヤーを直ちに表示することができるので、setup.tsファイルとuseJoinGame.tssファイルを以下のように書き換えましょう。
import { setupMUDNetwork } from "@latticexyz/std-client";
import { SystemTypes } from "contracts/types/SystemTypes";
import { config } from "./config";
import { components, clientComponents } from "./components";
import { world } from "./world";
import { SystemAbis } from "contracts/types/SystemAbis.mjs";
import { EntityID, overridableComponent } from "@latticexyz/recs";
import {
  createFaucetService,
  GodID as singletonEntityId,
} from "@latticexyz/network";
import { ethers } from "ethers";

export type SetupResult = Awaited<ReturnType<typeof setup>>;

export const setup = async () => {
  const result = await setupMUDNetwork<typeof components, SystemTypes>(
    config,
    world,
    components,
    SystemAbis
  );

  result.startSync();

  // For LoadingState updates
  const singletonEntity = world.registerEntity({ id: singletonEntityId });

  // Register player entity
  const address = result.network.connectedAddress.get();
  if (!address) throw new Error("Not connected");

  const playerEntityId = address as EntityID;
  const playerEntity = world.registerEntity({ id: playerEntityId });

    // Add support for optimistic rendering
    const componentsWithOverrides = {
      Position: overridableComponent(components.Position),
      Player: overridableComponent(components.Player),
    };

  // Request drip from faucet
  if (!config.devMode && config.faucetServiceUrl) {
    const faucet = createFaucetService(config.faucetServiceUrl);
    console.info("[Dev Faucet]: Player Address -> ", address);

    const requestDrip = async () => {
      const balance = await result.network.signer.get()?.getBalance();
      console.info(`[Dev Faucet]: Player Balance -> ${balance}`);
      const playerIsBroke = balance?.lte(ethers.utils.parseEther("1"));
      console.info(`[Dev Faucet]: Player is broke -> ${playerIsBroke}`);
      if (playerIsBroke) {
        console.info("[Dev Faucet]: Dripping funds to player");
        // Double drip
        address &&
          (await faucet?.dripDev({ address })) &&
          (await faucet?.dripDev({ address }));
      }
    };

    requestDrip();
    // Request a drip every 20 seconds
    setInterval(requestDrip, 20000);
  }

  return {
    ...result,
    world,
    singletonEntityId,
    singletonEntity,
    playerEntityId,
    playerEntity,
    components: {
      ...result.components,
      ...componentsWithOverrides,
      ...clientComponents,
    },
  };
};
import { useCallback, useMemo } from "react";
import { useComponentValueStream } from "@latticexyz/std-client";
import { uuid } from "@latticexyz/utils";
import { useMUD } from "./MUDContext";

export const useJoinGame = () => {
  const {
    components: { Position, Player },
    systems,
    playerEntity,
  } = useMUD();

  const canJoinGame = useComponentValueStream(Player, playerEntity)?.value !== true;

  const joinGame = useCallback(
    async (x: number, y: number) => {
      if (!canJoinGame) {
        throw new Error("already joined game");
      }

      const positionId = uuid();
      Position.addOverride(positionId, {
        entity: playerEntity,
        value: { x, y },
      });
      const playerId = uuid();
      Player.addOverride(playerId, {
        entity: playerEntity,
        value: { value: true },
      });

      try {
        const tx = await systems["system.JoinGame"].executeTyped({ x, y });
        await tx.wait();
      } finally {
        Position.removeOverride(positionId);
        Player.removeOverride(playerId);
      }
    },
    [Player, Position, canJoinGame, playerEntity, systems]
  );

  return useMemo(() => ({ canJoinGame, joinGame }), [canJoinGame, joinGame]);
};
step6: ローディング画面
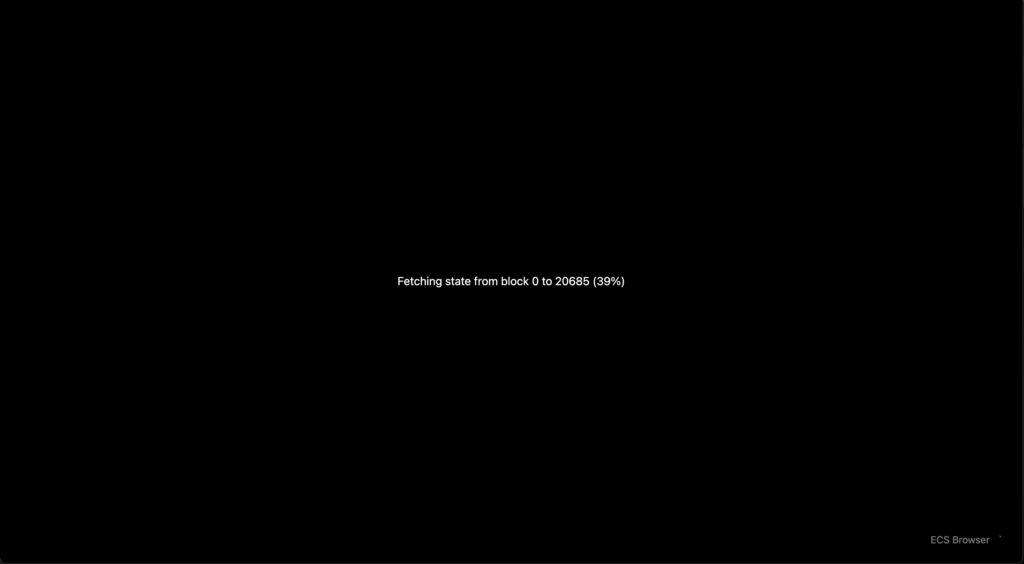
MUDのネットワークスタックにはクライアントサイドのLoadingStateコンポーネントが付属しており、「ネットワークへの接続」「ECSステートのダウンロード」など、クライアントが世界を起動する進捗状況をトラッキングすることができます。
次に進む前に、世界の状態がすべて読み込まれていることを確認しておく必要があるので、ロード画面を追加してみましょう。
import { SyncState } from "@latticexyz/network";
import { useComponentValueStream } from "@latticexyz/std-client";
import { useMUD } from "./MUDContext";
import { GameBoard } from "./GameBoard";

export const App = () => {
  const {
    components: { LoadingState },
    singletonEntity,
  } = useMUD();

  const loadingState = useComponentValueStream(LoadingState, singletonEntity) ?? {
    state: SyncState.CONNECTING,
    msg: "Connecting",
    percentage: 0,
  };

  return (
    <div className="w-screen h-screen flex items-center justify-center">
      {loadingState.state !== SyncState.LIVE ? (
        <div>
          {loadingState.msg} ({Math.floor(loadingState.percentage)}%)
        </div>
      ) : (
        <GameBoard />
      )}
    </div>
  );
};
step7.1: マップ設定用のシングルトンコンポーネント
地形を使ってマップをより面白くする前に、まずマップの設定をECSに移動しましょう。
このマップの設定は、将来的に移動の境界をチェックするためにmoveシステムで使用し、異なる地形タイプ(例えば高い草)にmovementを追加するために使用します。
ここでは、グローバルに1つの値を作成するためにシングルトンパターンを使用します。ECSを使用する必要は厳密にはありませんが、今やっておくことで、その場でマップを変更するオプションが開けます。
7.1-a|マップ設定コンポーネント
データの形式が非常に特殊なので、ここではカスタムコンポーネントを使用します。
組み込みコンポーネント型との主な違いは、コンポーネントスキーマ(雛形)を手動で定義する必要があることです。
これは通常、BoolComponentなどを継承する場合に自動的に行われます。コンポーネント内でスキーマを定義することで、MUDネットワーキングスタックがチェーンに保存されたコンポーネントデータをデコードすることができるようになります。
// packages/contracts/src/componentsディレクトリに MapConfigComponent.solファイルを作成
cd packages/contracts/src/components
touch MapConfigComponent.sol
// SPDX-License-Identifier: MIT
pragma solidity >=0.8.0;
import { BareComponent } from "solecs/BareComponent.sol";
import { LibTypes } from "solecs/LibTypes.sol";
import { SingletonID } from "../SingletonID.sol";
uint256 constant ID = uint256(keccak256("component.MapConfig"));
struct MapConfig {
uint32 width;
uint32 height;
}
contract MapConfigComponent is BareComponent {
constructor(address world) BareComponent(world, ID) {}
function getSchema() public pure override returns (string[] memory keys, LibTypes.SchemaValue[] memory values) {
keys = new string[](2);
values = new LibTypes.SchemaValue[](2);
keys[0] = "width";
values[0] = LibTypes.SchemaValue.UINT32;
keys[1] = "height";
values[1] = LibTypes.SchemaValue.UINT32;
}
function isSet() public view returns (bool) {
return has(SingletonID);
}
function set(MapConfig memory mapConfig) public {
set(SingletonID, abi.encode(mapConfig.width, mapConfig.height));
}
function getValue() public view returns (MapConfig memory) {
(uint32 width, uint32 height) = abi.decode(getRawValue(SingletonID), (uint32, uint32));
return MapConfig(width, height);
}
}5行目にあるimport { SingletonID } from "../SingletonID.sol";に赤波線が引かれてしまいエラーになるかと思います。公式に問い合わせてたところ共通の問題だそうなので、対応策として以下の手順でSingletonID.solファイルを作成し、保存しましょう。
// packages/contracts/srcディレクトリに SingletonID.solファイルを作成
cd packages/contracts/src/
touch SingletonID.sol
// SPDX-License-Identifier: MIT
pragma solidity >=0.8.0;
uint256 constant SingletonID = 0x60D;その後、MapConfigComponent.solファイルのコードをカット&ペーストなどすれば、エラー表記が解消されます。
7.1-b|Init(初期化)システム
コンポーネントはシステムによってのみ書き込まれるため、マップ設定を初期化するためのシステムInitSystemが必要です。作成しましょう。
// packages/contracts/src/systems/ディレクトリに InitSystem.solファイルを作成
cd packages/contracts/src/systems
touch InitSystem.sol
// SPDX-License-Identifier: MIT
pragma solidity >=0.8.0;
import { System, IWorld } from "solecs/System.sol";
import { getAddressById } from "solecs/utils.sol";
import { MapConfigComponent, ID as MapConfigComponentID, MapConfig } from "components/MapConfigComponent.sol";
uint256 constant ID = uint256(keccak256("system.Init"));
contract InitSystem is System {
constructor(IWorld _world, address _components) System(_world, _components) {}
function execute(bytes memory data) public returns (bytes memory) {
MapConfigComponent mapConfig = MapConfigComponent(getAddressById(components, MapConfigComponentID));
if (mapConfig.isSet()) return new bytes(0);
mapConfig.set(MapConfig({ width: 10, height: 10 }));
}
}通常、システムはクライアントから呼び出されます。一度初期化されたマップが他の人に上書きされるのを避けるために、システムはまず何よりも先にコンポーネントがセットされている(isSet)かどうかをチェックしています。
これを行うためには、デプロイ設定(deploy.json)にあるinitializeキーを使用します。その値はexecuteするためのcalldataとして渡されます。なお、今回のようにデータを渡す必要がない場合は、空のbytes値を使用します。
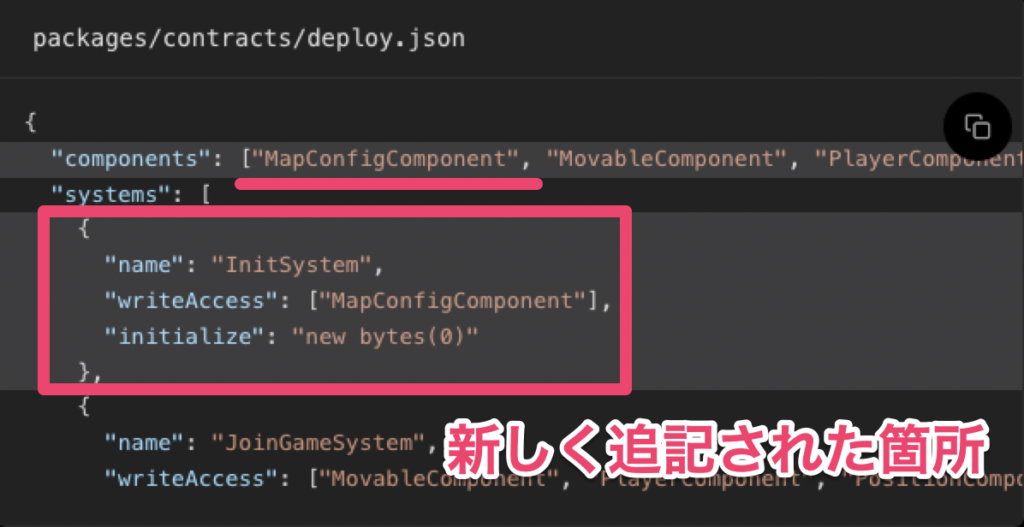
{
  "components": ["MapConfigComponent", "MovableComponent", "PlayerComponent", "PositionComponent"],
  "systems": [
    {
      "name": "InitSystem",
      "writeAccess": ["MapConfigComponent"],
      "initialize": "new bytes(0)"
    },
    {
      "name": "JoinGameSystem",
      "writeAccess": ["MovableComponent", "PlayerComponent", "PositionComponent"]
    },
    {
      "name": "MoveSystem",
      "writeAccess": ["PositionComponent"]
    }
  ]
}
7.1-c|クライアント側でのマップ設定
繰り返しますが、これはカスタムコンポーネントなので、クライアント側でそのコンポーネント定義の一部としてスキーマを定義する必要があります。
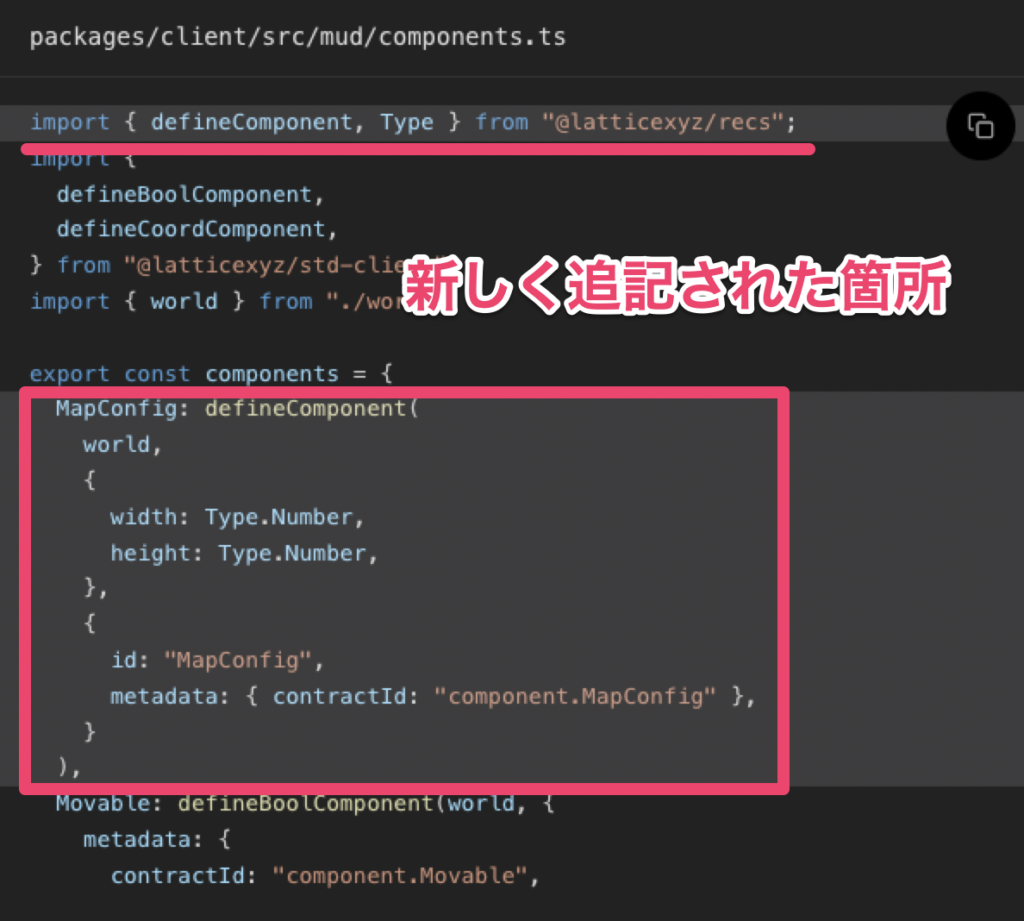
import { defineComponent, Type } from "@latticexyz/recs";
import {
  defineBoolComponent,
  defineCoordComponent,
} from "@latticexyz/std-client";
import { world } from "./world";

export const components = {
  MapConfig: defineComponent(
    world,
    {
      width: Type.Number,
      height: Type.Number,
    },
    {
      id: "MapConfig",
      metadata: { contractId: "component.MapConfig" },
    }
  ),
  Movable: defineBoolComponent(world, {
    metadata: {
      contractId: "component.Movable",
    },
  }),
  Player: defineBoolComponent(world, {
    metadata: {
      contractId: "component.Player",
    },
  }),
  Position: defineCoordComponent(world, {
    metadata: {
      contractId: "component.Position",
    },
  }),
};

export const clientComponents = {};
マップ設定については、新しいReactフックを使用して、使用する前に値が存在することを確認します。これにより、後続の処理での型の取り扱いが容易になります。
// packages/client/src/ディレクトリに useMapConfig.tsファイルを作成
cd packages/client/src
touch useMapConfig.ts
import { getComponentValue } from "@latticexyz/recs";
import { useMUD } from "./MUDContext";
export const useMapConfig = () => {
const {
components: { MapConfig },
singletonEntity,
} = useMUD();
const mapConfig = getComponentValue(MapConfig, singletonEntity);
if (mapConfig == null) {
throw new Error("game config not set or not ready, only use this hook after loading state === LIVE");
}
return mapConfig;
};
import { useComponentValueStream } from "@latticexyz/std-client";
import { useMUD } from "./MUDContext";
import { useMapConfig } from "./useMapConfig";
import { useJoinGame } from "./useJoinGame";
import { useMovement } from "./useMovement";
export const GameBoard = () => {
const {
components: { Position },
playerEntity,
} = useMUD();
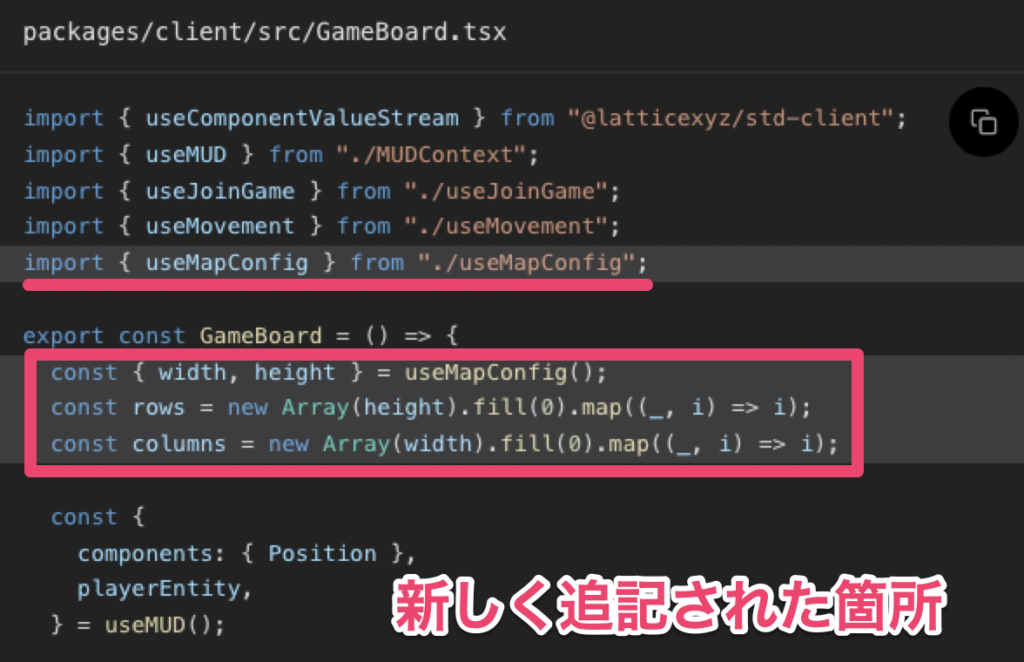
const mapConfig = useMapConfig();
const rows = new Array(mapConfig.height).fill(0).map((_, i) => i);
const columns = new Array(mapConfig.width).fill(0).map((_, i) => i);
const { canJoinGame, joinGame } = useJoinGame();
const playerPosition = useComponentValueStream(Position, playerEntity);
useMovement();
return (
<div className="inline-grid p-2 bg-lime-500">
{rows.map((y) =>
columns.map((x) => (
<div
key={`${x},${y}`}
className={`w-8 h-8 flex items-center justify-center ${
canJoinGame ? "cursor-pointer hover:ring" : ""
}`}
style={{
gridColumn: x + 1,
gridRow: y + 1,
}}
onClick={(event) => {
if (canJoinGame) {
event.preventDefault();
joinGame(x, y);
}
}}
>
{playerPosition?.x === x && playerPosition?.y === y ? (
<>🤠</>
) : null}
</div>
))
)}
</div>
);
};step7.2: マップサイズに合わせた移動の制限
これを解消していきたいのですが、ECSではマップサイズが設定されているので、それを使ってプレイヤーがマップの端に移動したときに「反対側から出現する」ようにしてみましょう。
そのために、いくつかの箇所で更新を行う必要があります。
7.2-a|moveシステムをアップデート
まずは、moveシステムの更新から始めましょう。
プレイヤー座標をマップの大きさに合わせるために、ちょっとした計算を行います。
// SPDX-License-Identifier: MIT
pragma solidity >=0.8.0;
import { System, IWorld } from "solecs/System.sol";
import { getAddressById, addressToEntity } from "solecs/utils.sol";
import { PositionComponent, ID as PositionComponentID, Coord } from "components/PositionComponent.sol";
import { MovableComponent, ID as MovableComponentID } from "components/MovableComponent.sol";
import { MapConfigComponent, ID as MapConfigComponentID, MapConfig } from "components/MapConfigComponent.sol";
uint256 constant ID = uint256(keccak256("system.Move"));
contract MoveSystem is System {
constructor(IWorld _world, address _components) System(_world, _components) {}
function execute(bytes memory args) public returns (bytes memory) {
return executeTyped(abi.decode(args, (Coord)));
}
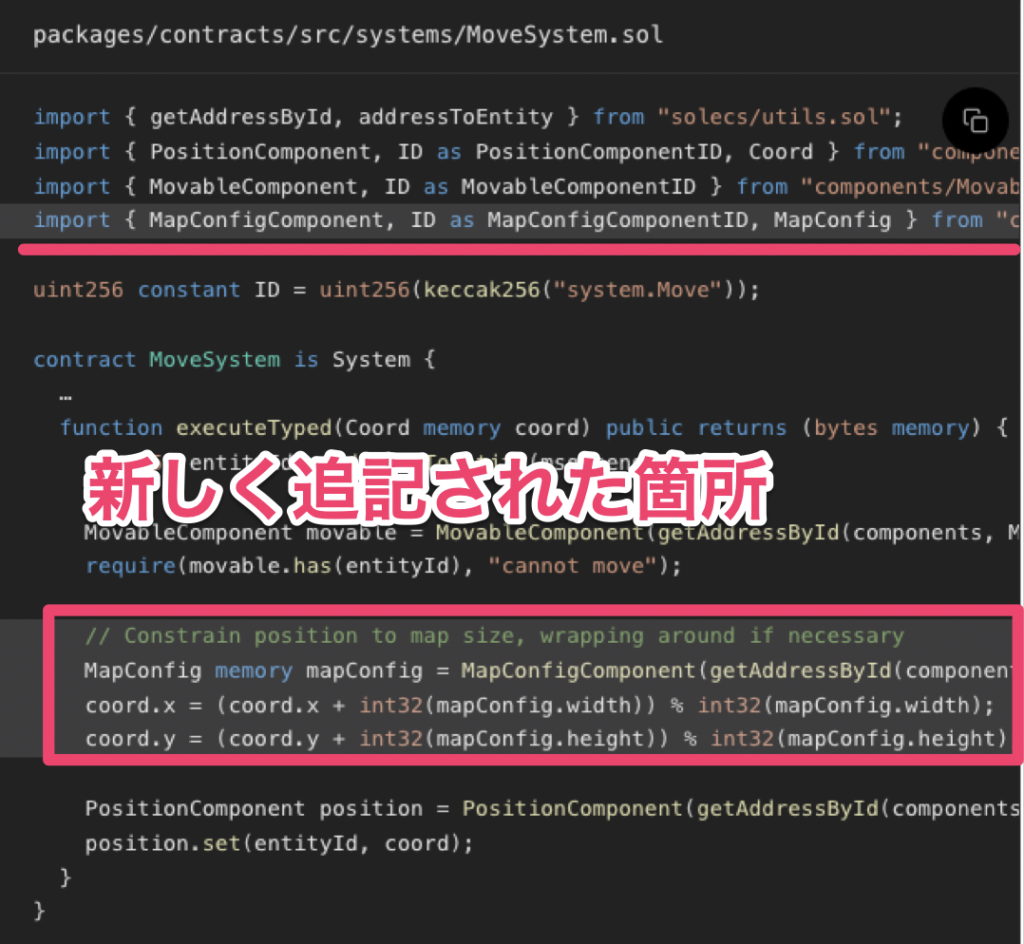
function executeTyped(Coord memory coord) public returns (bytes memory) {
uint256 entityId = addressToEntity(msg.sender);
MovableComponent movable = MovableComponent(getAddressById(components, MovableComponentID));
require(movable.has(entityId), "cannot move");
// Constrain position to map size, wrapping around if necessary
MapConfig memory mapConfig = MapConfigComponent(getAddressById(components, MapConfigComponentID)).getValue();
coord.x = (coord.x + int32(mapConfig.width)) % int32(mapConfig.width);
coord.y = (coord.y + int32(mapConfig.height)) % int32(mapConfig.height);
PositionComponent position = PositionComponent(getAddressById(components, PositionComponentID));
position.set(entityId, coord);
}
}7.2-b|joinシステムをアップデート
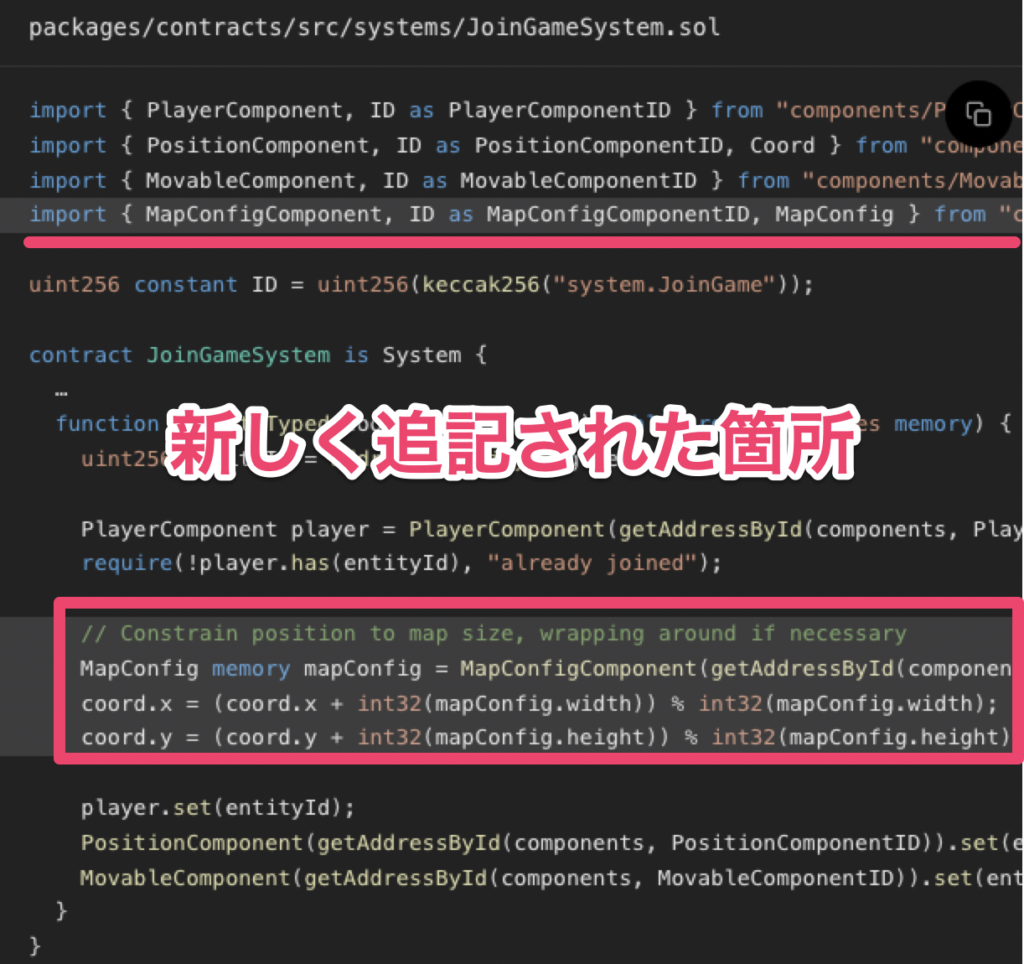
また、マップの外からプレイヤーが参加できないようにしたいので、そこにも同じロジックを追加します。
// SPDX-License-Identifier: MIT
pragma solidity >=0.8.0;
import { addressToEntity } from "solecs/utils.sol";
import { System, IWorld } from "solecs/System.sol";
import { getAddressById } from "solecs/utils.sol";
import { PlayerComponent, ID as PlayerComponentID } from "components/PlayerComponent.sol";
import { PositionComponent, ID as PositionComponentID, Coord } from "components/PositionComponent.sol";
import { MovableComponent, ID as MovableComponentID } from "components/MovableComponent.sol";
import { MapConfigComponent, ID as MapConfigComponentID, MapConfig } from "components/MapConfigComponent.sol";

uint256 constant ID = uint256(keccak256("system.JoinGame"));

contract JoinGameSystem is System {
  constructor(IWorld _world, address _components) System(_world, _components) {}

  function execute(bytes memory args) public returns (bytes memory) {
    Coord memory coord = abi.decode(args, (Coord));
    return executeTyped(coord);
  }

  function executeTyped(Coord memory coord) public returns (bytes memory) {
    uint256 entityId = addressToEntity(msg.sender);

    PlayerComponent player = PlayerComponent(getAddressById(components, PlayerComponentID));
    require(!player.has(entityId), "already joined");

    // Constrain position to map size, wrapping around if necessary
    MapConfig memory mapConfig = MapConfigComponent(getAddressById(components, MapConfigComponentID)).getValue();
    coord.x = (coord.x + int32(mapConfig.width)) % int32(mapConfig.width);
    coord.y = (coord.y + int32(mapConfig.height)) % int32(mapConfig.height);

    player.set(entityId);
    PositionComponent(getAddressById(components, PositionComponentID)).set(entityId, coord);
    MovableComponent(getAddressById(components, MovableComponentID)).set(entityId);
  }
}
7.2-c|Optimisticアップデート
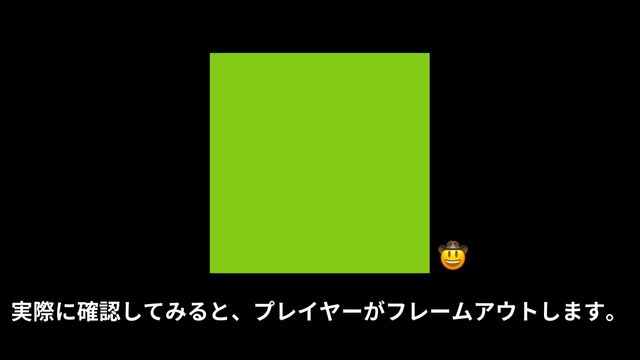
ここまでの実装により、プレイヤーがマップの端から外に出ようとすると、一瞬消えてからマップの反対側に再び現れるようになりました。
これは、移動に対して楽観的な更新を行っているためですが、新しいラッピングロジックは考慮されていませんので、useMovement.tsに追記してみましょう。
import { useCallback, useEffect, useMemo } from "react";
import { useComponentValueStream } from "@latticexyz/std-client";
import { uuid } from "@latticexyz/utils";
import { useMUD } from "./MUDContext";
import { useMapConfig } from "./useMapConfig";

export const useMovement = () => {
  const {
    components: { Position },
    systems,
    playerEntity,
  } = useMUD();

  const { width, height } = useMapConfig();
  const playerPosition = useComponentValueStream(Position, playerEntity);

  const moveTo = useCallback(
    async (x: number, y: number) => {
      const wrappedX = (x + width) % width;
      const wrappedY = (y + height) % height;

      const positionId = uuid();
      Position.addOverride(positionId, {
        entity: playerEntity,
        value: {
          x: wrappedX,
          y: wrappedY,
        },
      });

      try {
        const tx = await systems["system.Move"].executeTyped({ x, y });
        await tx.wait();
      } finally {
        Position.removeOverride(positionId);
      }
    },
    [Position, height, playerEntity, systems, width]
  );

  const moveBy = useCallback(
    async (deltaX: number, deltaY: number) => {
      if (!playerPosition) {
        console.warn("cannot moveBy without a player position, not yet spawned?");
        return;
      }
      await moveTo(playerPosition.x + deltaX, playerPosition.y + deltaY);
    },
    [moveTo, playerPosition]
  );

  useEffect(() => {
    const listener = (e: KeyboardEvent) => {
      if (e.key === "ArrowUp") {
        moveBy(0, -1);
      }
      if (e.key === "ArrowDown") {
        moveBy(0, 1);
      }
      if (e.key === "ArrowLeft") {
        moveBy(-1, 0);
      }
      if (e.key === "ArrowRight") {
        moveBy(1, 0);
      }
    };

    window.addEventListener("keydown", listener);
    return () => window.removeEventListener("keydown", listener);
  }, [moveBy]);

  return useMemo(() => ({ moveTo, moveBy }), [moveTo, moveBy]);
};step7.3: 隣接するスペースにのみ移動
マップ上のどのスペースにもテレポートできるのではなく、一度に1つのスペースしか移動できない方がよりゲームらしく感じられると思うので、本節ではそれを追加していきましょう。
7.3-a|マップライブラリ
まず、マップロジック用の新しいライブラリを導入しましょう。これにより、複雑なpure関数をシステムの外に置いて、少しでも分かりやすくなります。
2つの座標の距離をチェックするために、ここでは「マンハッタン距離」アプローチを使用していきます。
// packages/contracts/src/ディレクトリに LibMap.solファイルを作成
cd packages/contracts/src
touch LibMap.sol
// SPDX-License-Identifier: MIT
pragma solidity >=0.8.0;
import { Coord } from "components/PositionComponent.sol";
library LibMap {
function distance(Coord memory from, Coord memory to) internal pure returns (int32) {
int32 deltaX = from.x > to.x ? from.x - to.x : to.x - from.x;
int32 deltaY = from.y > to.y ? from.y - to.y : to.y - from.y;
return deltaX + deltaY;
}
}7.3-b|moveシステムでの距離チェック
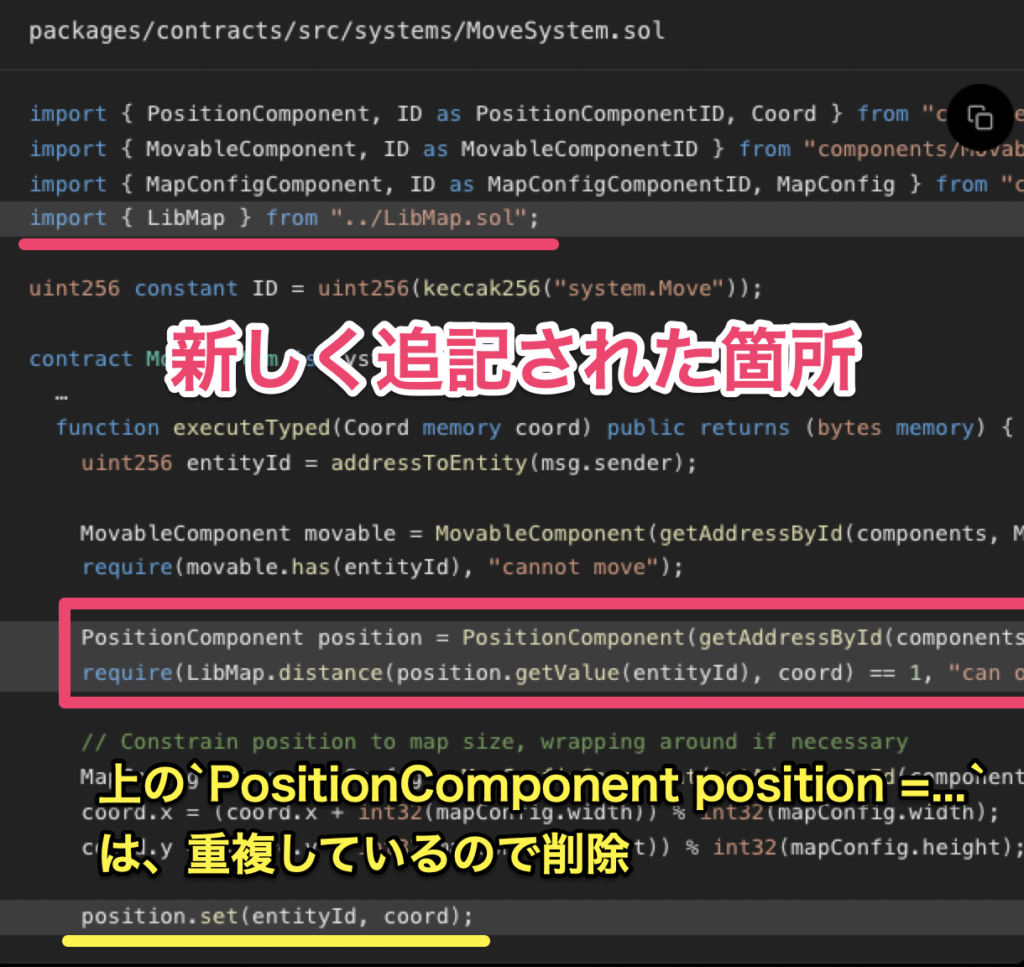
ここで、先ほどのライブラリにある新しいdistance関数を使って、プレイヤーが1度に1つの空間しか移動していないかどうかを確認してみましょう。
// SPDX-License-Identifier: MIT
pragma solidity >=0.8.0;
import { System, IWorld } from "solecs/System.sol";
import { getAddressById, addressToEntity } from "solecs/utils.sol";
import { PositionComponent, ID as PositionComponentID, Coord } from "components/PositionComponent.sol";
import { MovableComponent, ID as MovableComponentID } from "components/MovableComponent.sol";
import { MapConfigComponent, ID as MapConfigComponentID, MapConfig } from "components/MapConfigComponent.sol";
import { LibMap } from "../LibMap.sol";

uint256 constant ID = uint256(keccak256("system.Move"));

contract MoveSystem is System {
  constructor(IWorld _world, address _components) System(_world, _components) {}

  function execute(bytes memory args) public returns (bytes memory) {
    return executeTyped(abi.decode(args, (Coord)));
  }

  function executeTyped(Coord memory coord) public returns (bytes memory) {
    uint256 entityId = addressToEntity(msg.sender);

    MovableComponent movable = MovableComponent(getAddressById(components, MovableComponentID));
    require(movable.has(entityId), "cannot move");

    PositionComponent position = PositionComponent(getAddressById(components, PositionComponentID));
    require(LibMap.distance(position.getValue(entityId), coord) == 1, "can only move to adjacent spaces");

    // Constrain position to map size, wrapping around if necessary
    MapConfig memory mapConfig = MapConfigComponent(getAddressById(components, MapConfigComponentID)).getValue();
    coord.x = (coord.x + int32(mapConfig.width)) % int32(mapConfig.width);
    coord.y = (coord.y + int32(mapConfig.height)) % int32(mapConfig.height);

    position.set(entityId, coord);
  }
}
7.3-c|クリック移動の削除
キーボードによるプレイヤーの移動は、既に1タイルずつ移動するように構成されていますが、現状マップ上のどこでもクリックすることで移動できてしまいます。
しかし、新たに実装した距離チェックにより、1つ以上離れた場所をクリックするとトランザクションが失敗/元に戻されるため、このままでは優れたUXではありません。
ということで、クライアントを更新して、「クリックしたらspawn(生成)するだけ」に制限するように実装しましょう。
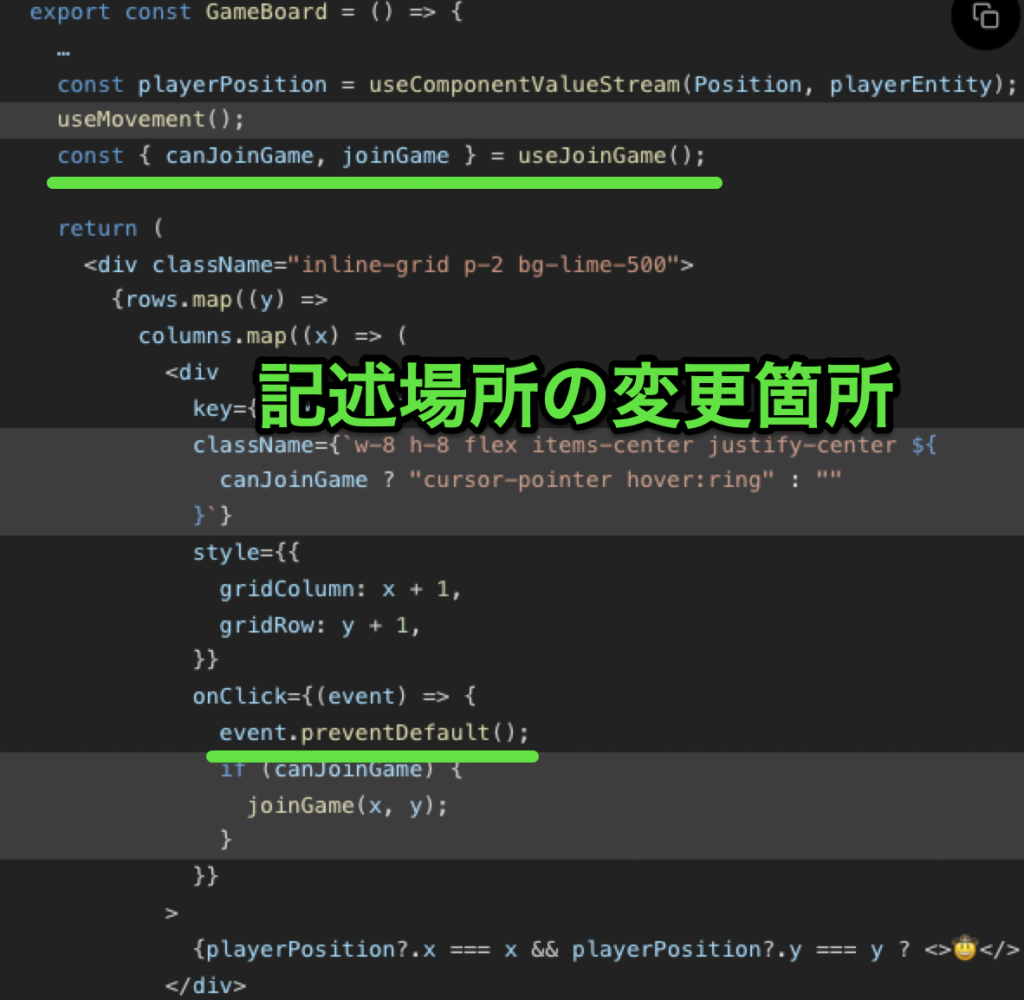
import { useComponentValueStream } from "@latticexyz/std-client";
import { useMUD } from "./MUDContext";
import { useMapConfig } from "./useMapConfig";
import { useJoinGame } from "./useJoinGame";
import { useMovement } from "./useMovement";

export const GameBoard = () => {
  const {
    components: { Position },
    playerEntity,
  } = useMUD();

  const mapConfig = useMapConfig();
  const rows = new Array(mapConfig.height).fill(0).map((_, i) => i);
  const columns = new Array(mapConfig.width).fill(0).map((_, i) => i);

  const playerPosition = useComponentValueStream(Position, playerEntity);
  useMovement();
  const { canJoinGame, joinGame } = useJoinGame();

  return (
    <div className="inline-grid p-2 bg-lime-500">
      {rows.map((y) =>
        columns.map((x) => (
          <div
            key={`${x},${y}`}
            className={`w-8 h-8 flex items-center justify-center ${
              canJoinGame ? "cursor-pointer hover:ring" : ""
            }`}
            style={{
              gridColumn: x + 1,
              gridRow: y + 1,
            }}
            onClick={(event) => {
              event.preventDefault();
              if (canJoinGame) {
                joinGame(x, y);
              }
            }}
          >
            {playerPosition?.x === x && playerPosition?.y === y ? (
              <>🤠</>
            ) : null}
          </div>
        ))
      )}
    </div>
  );
};
const { canJoinGame, joinGame } = useJoinGame();とevent.preventDefault();の記載箇所を変更したことで、マウスクリックによる移動に制限をかけることができました。
上記の内容で、前編は終了となります。もし反響があれば、後編も公開する予定です。
まとめ
今回は、MUDチュートリアル「Emojimon」を実際に進めながら、MUDの応用や自律型世界の構築手法、またオンチェーンゲーム開発のノウハウについて解説しました。
本記事が、MUDチュートリアル「Emojimon」やMUDを用いた自律型世界(オンチェーンゲーム)の構築方法などについて理解したいと思われている方にとって、少しでもお役に立ったのであれば幸いです。
また励みになりますので、参考になったという方はぜひTwitterでのシェア・コメントなどしていただけると嬉しいです。
🧭実際に自律型世界(オンチェーンゲーム)を構築してみた【前編】
— イーサリアムnavi🧭毎週土曜日の昼に配信 (@ethereumnavi) February 25, 2023
🎮 @latticexyzチームの @frolic氏が提供するMUDチュートリアル「Emojimon」
🎮MUDを用いたオンチェーンゲームの構築方法を学べるというので試してみた
🎮web3開発初心者もコピペでOK
詳しくはこちら👇https://t.co/pjEjtNbsXX
イーサリアムnaviを運営するSTILL合同会社では、web3/crypto関連の記事執筆業務やリサーチ代行、その他(ご依頼・ご提案・ご相談など)に関するお問い合わせを受け付けております。
まずはお気軽に、こちらからご連絡ください。
- 法人プランLP:https://ethereumnavi.com/lp/corporate/
- Twitter:@STILL_Corp
- メールアドレス:info@still-llc.com